1. Revisions
1.1. Changes in version 27.0
-
Images updated
-
mRay Configuration updated
-
Known issues updated
-
Advanced options updated
-
Pool management updated
-
System requirements updated
1.2. Changes in version 26.0
-
Known issues updated
-
Teleradiology added
1.3. Changes in version 25.0
-
Resetting of 2FA in User management was described.
-
Known issues updated
1.4. Changes in version 24.0
-
User management updated
-
Group management updated
-
Status tab updated
-
Remote Auto-Update image updated
-
Generate statistics image updated
1.5. Changes in version 23.0
-
Update the System requirements
1.6. Changes in version 22.0
-
Added note to Installation who is qualified for installation
-
Abbreviations were added
1.7. Changes in version 21.0
-
mRay Gateway updated
-
Group management updated
-
Installation updated
-
mRay server updated
-
Pool management updated
-
User management updated
-
FAQ updated
1.8. Changes in version 20.0
-
Generate statistics was added
-
System requirements were updated
1.9. Changes in version 19.0
-
Security recommendations were added
-
Intended Purpose updated
-
Intended Use was added
-
Known issues updated
1.10. Changes in version 17.0
-
Restyled the entire manual
-
Log was reworked (see Server log)
-
Improved installation chapter (see Installation)
-
Improved Screenshots
2. Symbols
|
Note
This paragraph contains additional information for the reader. |
|
Tips
This paragraph contains additional tips for the usage of the product. |
|
Warning
This section contains warnings that can occur when the application is not used correctly. |
|
Caution
This paragraph tells the user that the application must be used carefully. |
|
Important
This section includes important information for the usage of mRay. |
3. Manufacturer
mRay 6.7
Radiological image viewer for mobile devices with image processing functions
© 2022 mbits imaging GmbH
mbits imaging GmbH |

|
3.1. UDIs
mRay Server Windows |
42606483500660 |
4. Intended Purpose
The software mRay as a radiology instrument can be used by medical specialists for the visualization of image data. Image processing allows the calculation and visualization of healthy and abnormal tissues.
5. Intended Use
5.1. General
The patient group, for which mRay can be used, includes all patients from whom radiological image data has been created for the purpose of diagnosis or treatment. In a worst-case scenario the medical condition of the patient may be critical.
mRay can be operated in hospitals, medical practices, on the go or at home. The software is dedicated for mobile devices for fast and immediate access to radiologic images for informational purposes. When using mRay for diagnostic purposes, national regulations must be considered and an appropriate display must be used. mRay allows the display of images and data types that are defined by the Digital Imaging and Communications in Medicine (DICOM) standard (e.g. computed tomography (CT), magnetic resonance imaging (MRI), positron emission tomography (PET), fluoroscopy (XA), digital x-ray (CR), ultrasound (US)). The software offers common radiological software tools (e.g. windowing, measurements, thick slices and annotations).
Furthermore mRay is capable of performing image processing tasks such as finding, visualizing and quantifying anomalies in tissue. In particular the image analysis module mRay VEOcore may be used to perform an automated processing of brain images from imaging modalities such as CT, CT-Perfusion, or MRI including a Diffusion Weighted Imaging (DWI) Module. As a result, changes in contrast over time are visualized as colored perfusion maps, including flow related parameters and tissue blood volume quantification.
5.2. Contra-indications
5.3. Medical benefits
If mRay is used for viewing medical image data it can be used in the decision process for diagnosis and therapy. The following functionalities allow to do so.
To examine findings in CT images mRay Client is able to visualize images in accordance to the DICOM Grayscale Standard Display Function. By doing so a suitable mobile device is acting as a "Bildwiedergabesystem mit Befundqualität" in accordance with the DIN 6868-157. The constant availability of mobile devices results in time savings compared to stationary solutions.
The perfusion analysis of brain imaging data visualizes and quantifies tissue that is less supplied with blood (penumbra), oxygen deprived tissue caused by obstructed blood flow (core tissue) and the mismatch ratio between the two. The calculated values can be used to support decision making based on an assessment of the extent of tissue damage.
5.4. Warnings
-
mRay may not be used on a mobile device (tablet, smartphone or notebook) in a room containing a Magnetic Resonance Imaging (MRI) scanner.
5.4.1. Notes for use in diagnosis findings
For the use of mRay in the diagnostic context on mobile devices according to the German legal regulations (QSRL, DIN 6868-157), the instructions under the link must be followed: https://mbits.info/downloads/mRay-Nutzungsanweisungen_Befundung.pdf.
|
When operating mRay on a Windows PC or Mac, the image display system (BWS) must be calibrated and approved accordingly. Restrictions with regard to the modalities must then be derived from the BWS. |
6. Introduction
In order to manage and configure the mRay server application, there are three software tools:
-
The mRay server application to start or restart the server, install a service, to set the port of the server through which clients communicate with the server and to install the license file.
-
The mRay Configuration application to configure the server and to manage data access, users and groups.
-
The mRay Gateway application allows to setup external access points for an mRay server without opening or forwarding ports in the internal network.
The following sections describe the individual functions of these applications.
7. Installation
|
The installation should be performed by an IT-administrator or a member of the mbits support staff. |
7.1. Initial installation
This paragraph applies only to the Windows-installation.
Run the downloaded setup routine (named, for example, "mRayServer-6.1-win64-*.exe").
First Administrator rights are requested. Please note that the installation routine only needs those rights in order to install in the default folder 'C:\Program Files\mRay Server'. Please accept the dialog, no other modifications will be made to the system.
In the rest of the process, please follow the instructions of the installer program. At the end of the installation the server application is automatically started and installed as a service.
7.2. Update
To perform an update just run the setup executable, which will detect any running mRay instances and close them automatically. The existing data will not be deleted or overwritten. After the update is complete mRay Server will restart itself.
|
New features require an update of your license file in order to be activated. Please consult the support of the installation. |
7.2.1. Reinstallation / Future updates
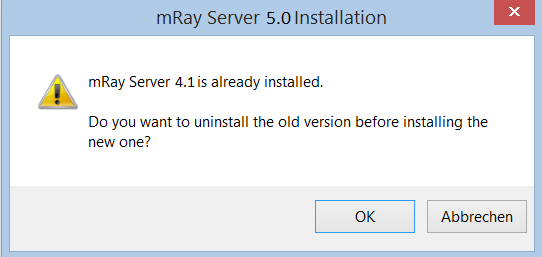
In case of an update or a new installation, you can simply run the installer package (again). This will first try to uninstall the existing version (see Uninstall old version dialog). Afterwards, a normal installation is performed as described above. Note, however, that the uninstall process can delete existing data when requested. Please read the following subsection carefully.
7.3. Uninstall
The uninstaller removes the currently installed version of the software. Please be nevertheless careful that you do not accidentally delete the existing data in this step unless you explicitly want to do so.
8. mRay server
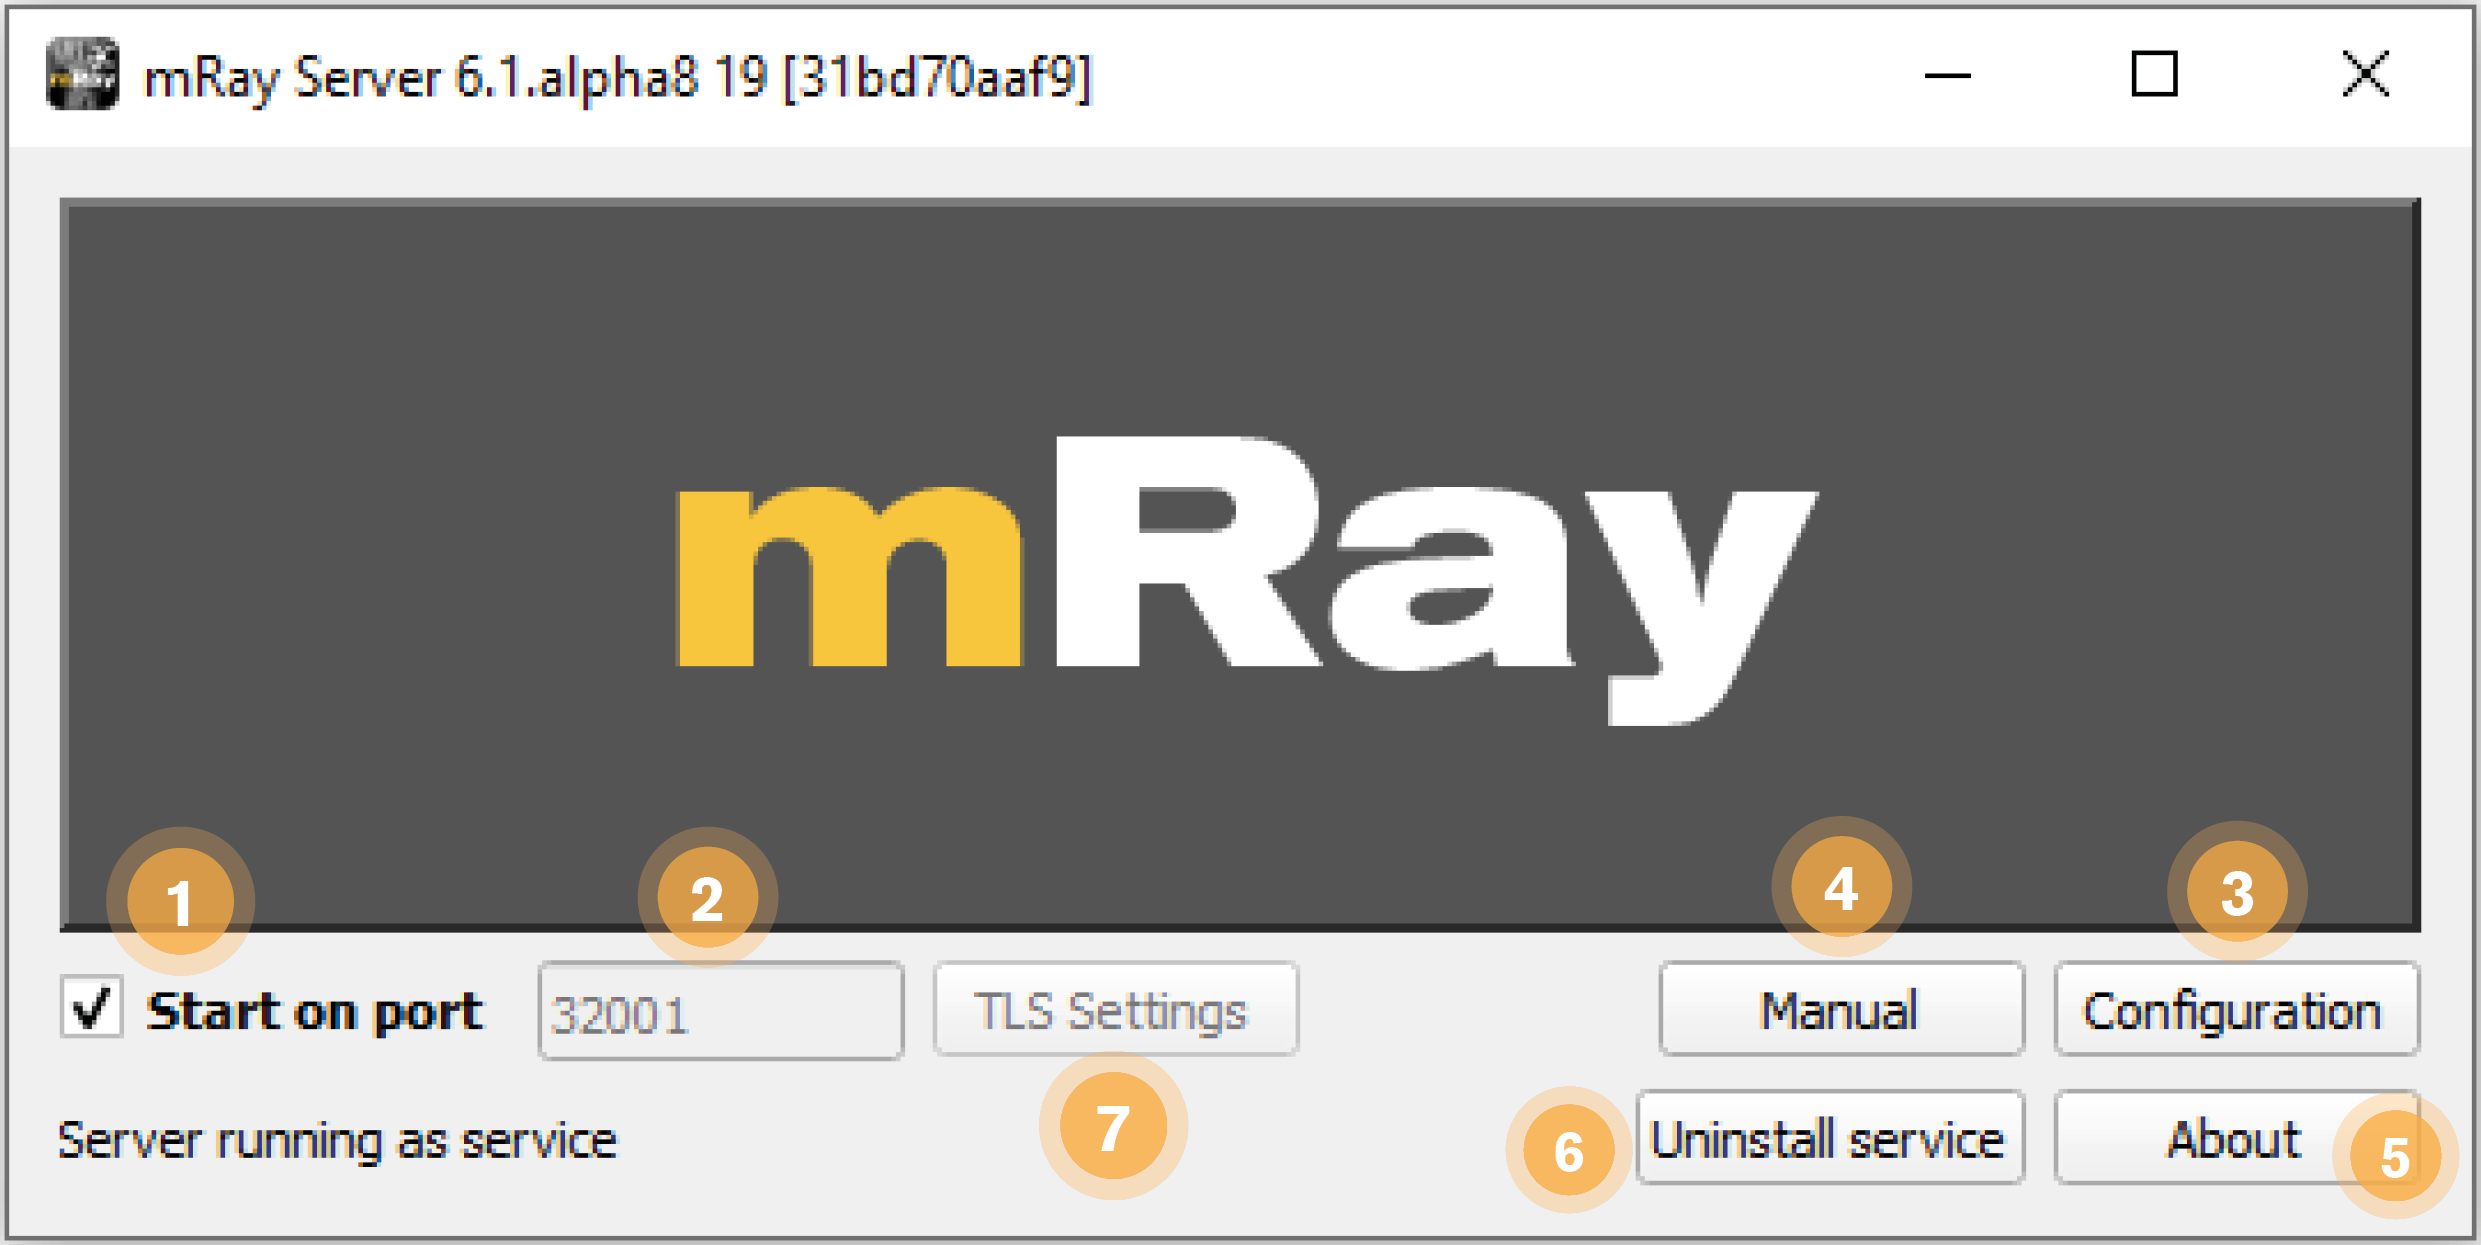
The application mRay Server starts or stops the server process. In addition, a port can be set to under which the server is available. The server can be started as an ordinary application or automatically via a Windows service. We recommend to start the server via a service. This ensures that your server is restarted automatically in case of an unexpected system restart. Additionally, no logon is required to restart the server. In a separate chapter 'Server Execution Models' you can learn more about the service installation process. The application can be seen in Server application dialog:
-
Checkbox for starting or stopping the server process.
-
Configures the server communication port.
-
Starts the mRay Configuration application.
-
Opens the Admin Manual.
-
Shows the server version, the intended use and license terms.
-
You can switch between two different server execution models (application and service) over this button (more about that in chapter 'Server Execution Models').
-
With this button you can provide an SSL certificate, which is needed to use the mRay web client and the registration process for the upload service. This setting is only necessary if you are not using a gateway and still want to use the above functions. For the SSL certificate the following criteria must be met.
9. License installation
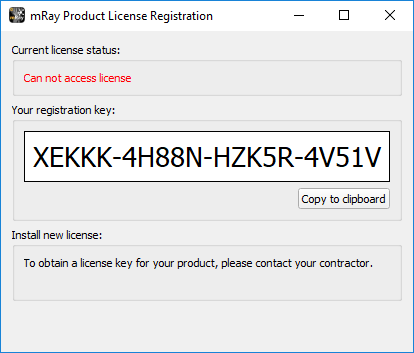
To use mRay Server without any restrictions you need to obtain a license and activate it via the mRay server configuration. You can get a license by contacting your contractor. The following steps are required to do an activation:
-
Run the newly installed mRay server application.
-
A popup appears (see Product license registration dialog) which prompts you to install a license. It also shows you additional information such as:
-
License status: Displays how long your license is valid.
-
Registration key: This key needs to be submitted to your contractor to obtain an activation key.
-
-
Now it is time to get in contact with your contractor and to send him your registration key. After he has received your key, he will send you back an activation key.
-
Now go back to the mRay Server application window and click the' Configuration' button.
-
The mRay Server configuration opens. Now log on to the server with the "admin" account via the configuration. Please note the server text field, which specifies the target address of the server to which you want to connect and install the license. In the case of a remote license installation, this field may need to be edited.
-
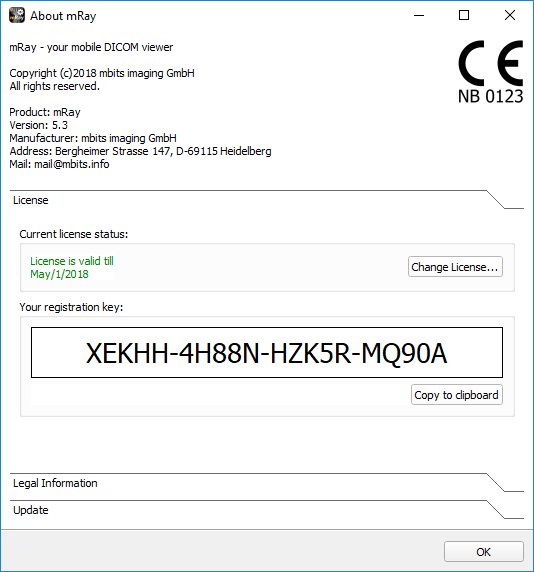
After successful login please click on the "About this mRay server" button, which opens a dialog with the title bar "About mRay". This allows you to install a license (see About dialog).
-
With the reception of your activation key you are ready to activate the server by installing it via the 'Select license file' button. When you click on the button a file explorer opens which prompts you to input the path to your license file.
-
If the license file is valid you can now proceed to start and configure your server. If not, the mRay server application automatically closes and you will be prompted again to install a license after you restarted the mRay server application.
The same procedure is valid for a reactivation of your license which is needed in case of a license prolongation or a booking of additional modules. Since you are not prompted automatically again to activate your server, you need to open the reactivation dialog manually. You can access it via the "About" dialog of the mRay Server configuration. To do this, click on the "About" button after you have logged in as "admin" via the configuration on the server. Please click on the button labeled 'Change license'. Now, the activation dialog explained previously opens again. From there you can proceed with the steps described in the last section.
10. Server execution models
There are two different execution models of the server. The first one is to execute the server as an ordinary application. To run the server in this mode two requirements need to be met: You need to keep the mRay server application window open and the checkbox 'start on port' must be checked. A disadvantage of this execution model is that the server will get and be kept deactivated if the mRay server application is closed accidentally or the system restarts unexpectedly unless the server is restarted again manually.
The second execution model is to install the server as a service. With this model you do not need to keep the mRay server application window open and the server restarts automatically if the system restarts. Furthermore a login at the logon screen is not required.
To switch between both modes you can to click on the button labeled 'Install as service' or 'Uninstall service' within the mRay server application. 'Install as service' installs the service as a service application (second mode) whereas 'Uninstall service' runs the server as an ordinary application (first mode). The button labeling is alternating.
|
A service is not allowed to access a network drive unless the affected host system (computer name) is listed in the ACL (access control list) of the network drive. An alternative is to run the service under a different account as opposed to the LocalSystem account which is authorized to access the network drive. Please ensure that the account has full access to the application data of mRay (C:\ProgramData\MBITS\mRayServer) and to all of the registered folders in the configuration. |
11. mRay Gateway
The mRay gateway offers a connection forwarding for mRay clients to a mRay server where the clients may have no direct access to the mRay server itself e.g. if you are running your mRay server in a closed network.
In order to install the gateway application, run the mRayGateway-*-win64.exe and follow the install programs instructions.Wait until the installation process has completed and run the gateway application.
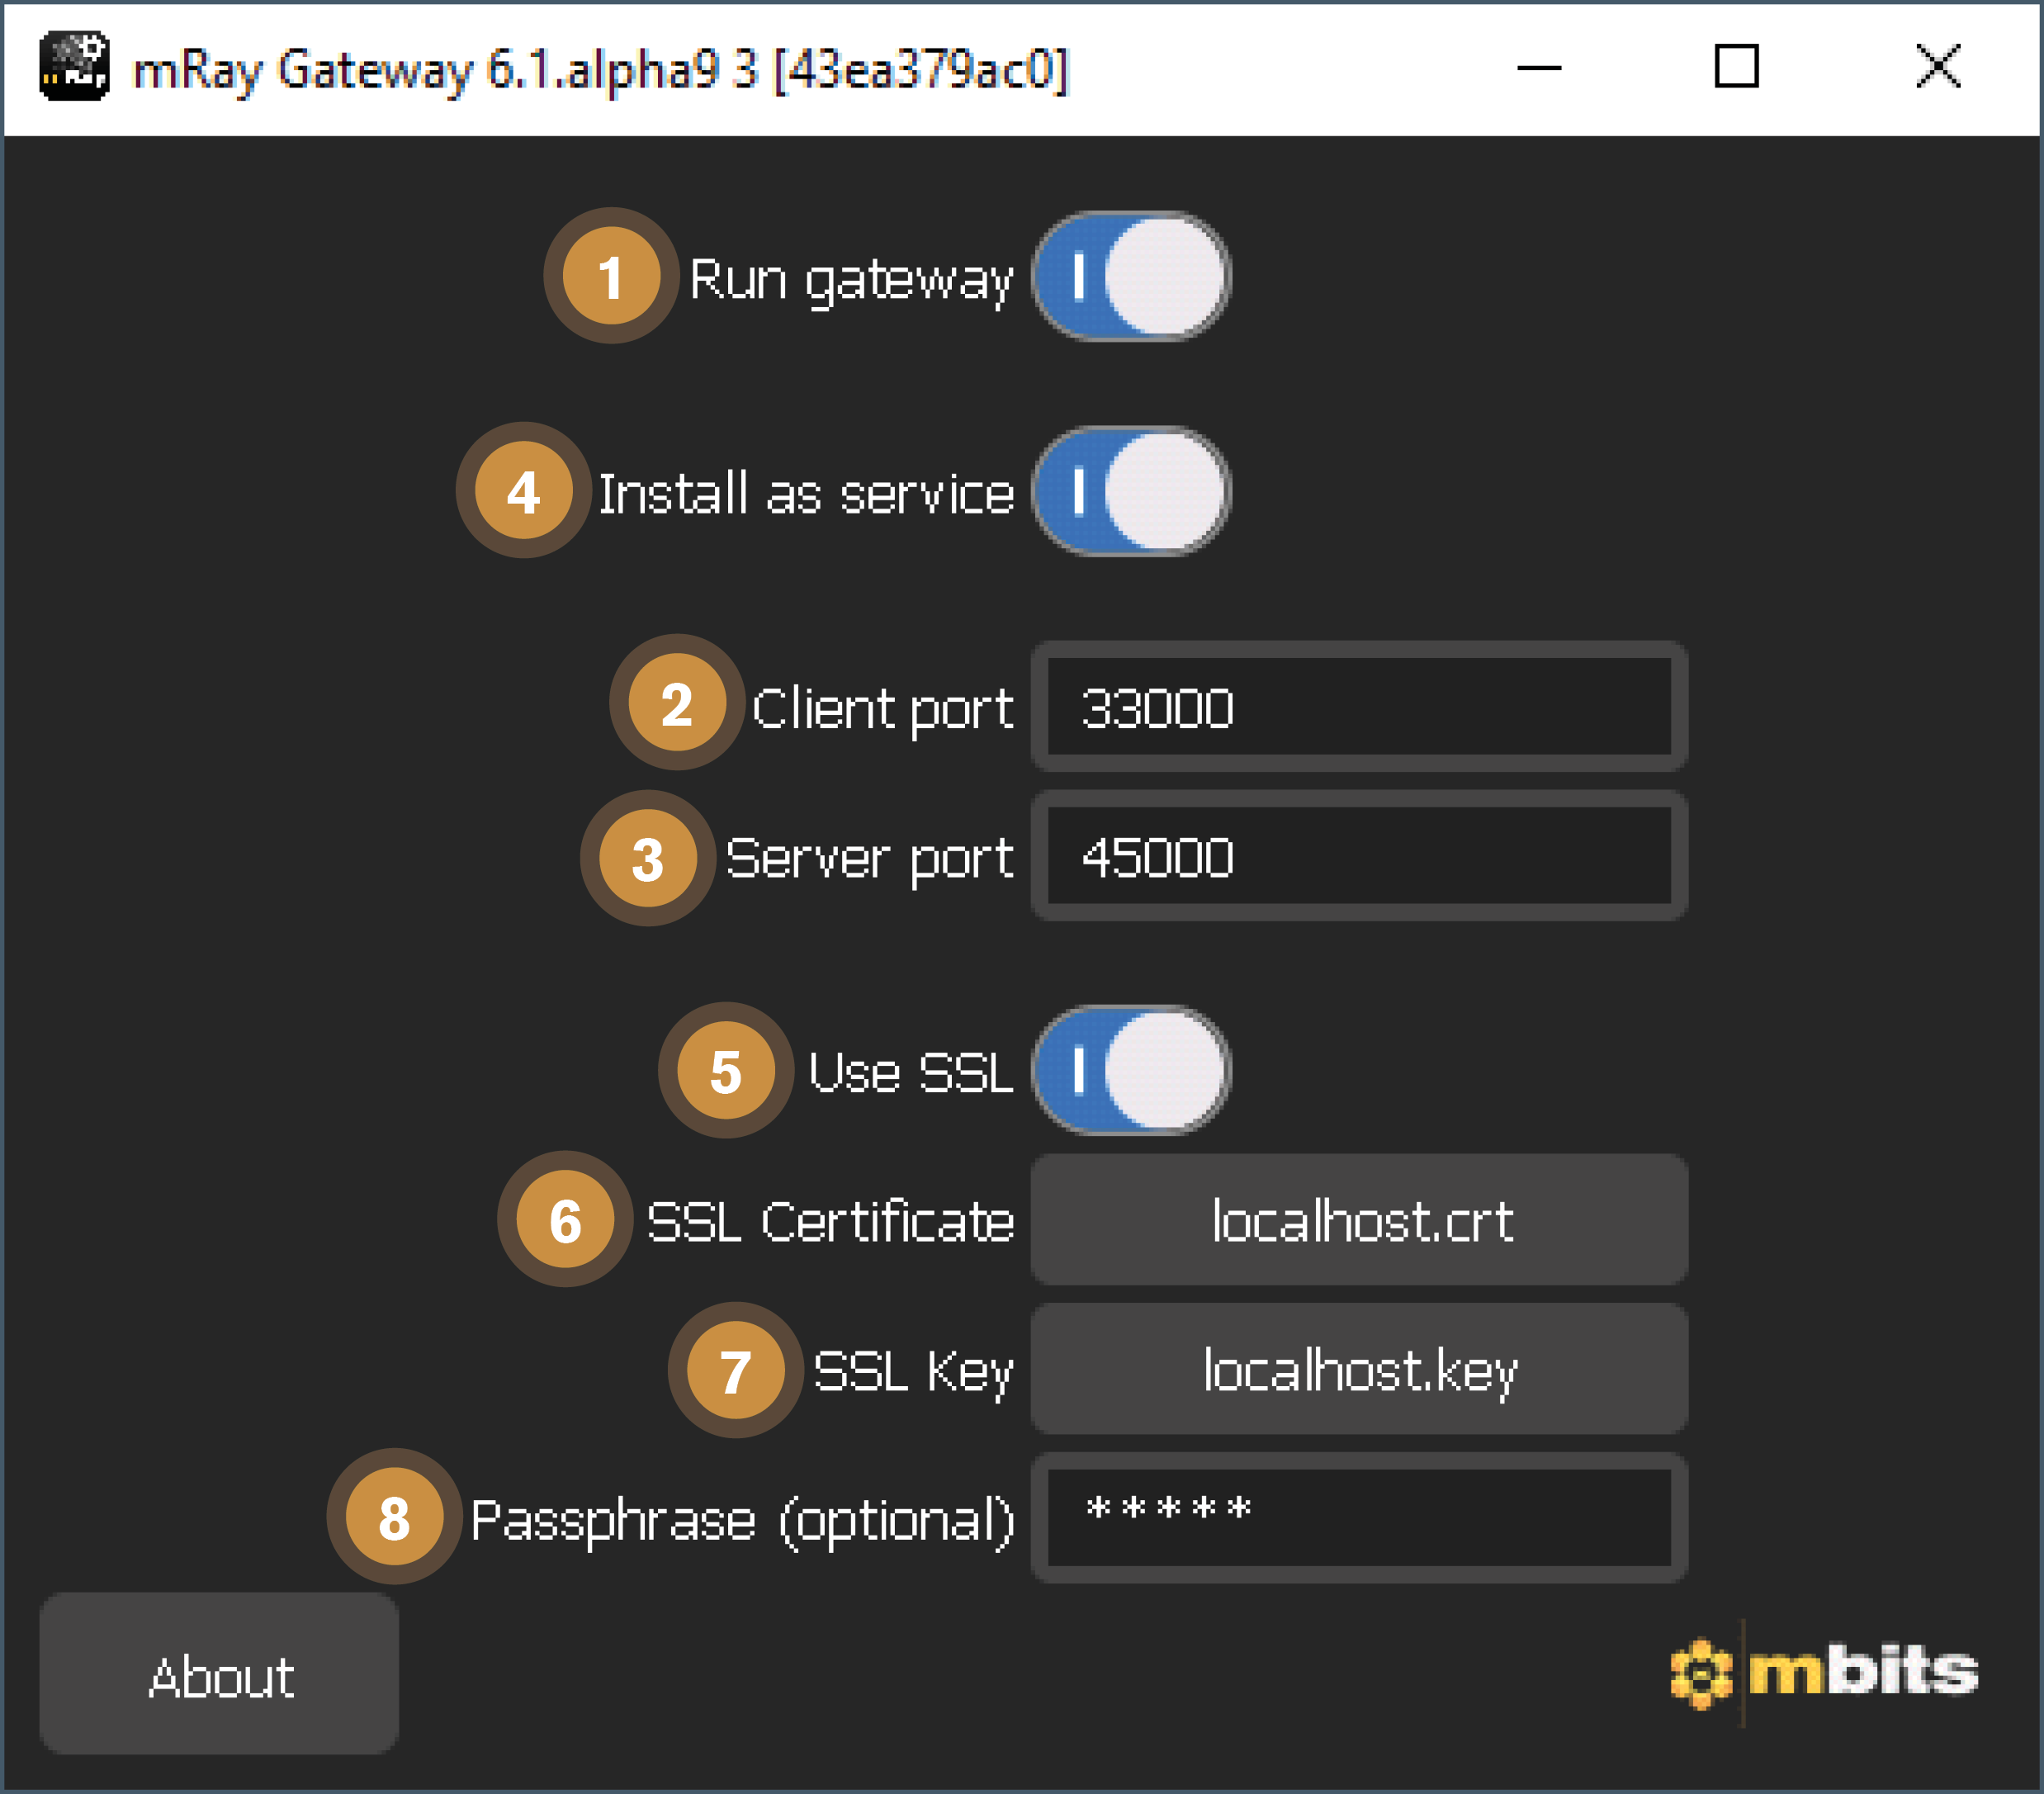
The gateway launcher offers a small user interface to configure the application.
-
Run gateway: Toggle to run or stop the gateway process.
-
Client port: The port used by mRay clients to connect to the gateway.
-
Server port: The port used by the mRay server to connect to the gateway.
-
Install as service: Installs the mRay gateway as a Windows service.
-
Use SSL: Activates SSL connections, which are required to use the mRay Web Client and the registration process for the upload service. This requires an SSL certificate and a private key for your public DNS under which your mRay gateway can be reached.
-
SSL certificate: The path to your SSL certificate, issued for your public DNS under which your mRay gateway can be reached.
-
SSL key: The path to your private SSL key issued to your public DNS under which your mRay Gateway is accessible.
-
Passphrase (optional): Password to your private key, if it is password protected.
|
The certificate must meet the following criteria:
|
To connect your mRay server to the gateway installation, enter the address of the gateway with the port of the gateway in the mRay configuration like it is shown in General Settings (see Configuration settings).
12. mRay Configuration
The mRay Configuration application is used to manage the server system (see Configuration status). You can change general settings, pool, users, groups and monitor the server process. Please log in with an administrator user in order to make adjustments.
12.1. Connection window
The connection window (see Configuration connection section) is used to connect to the server:

-
The network address including the port of the server you want to connect to
-
Enter your administrator login name (default name is 'admin' ) here.
-
Specify the administrator password that you received by your mbits contact. The password should be changed after the first login.
-
If everything is correct, you can connect to the server using the Connect button.
|
Change initial password
The initial password must be changed on first login. Please make sure you are using a secure password. |
12.2. Configuration window
The Home screen (see Configuration status) contains the general configuration tabs, which are explained in the following sections:
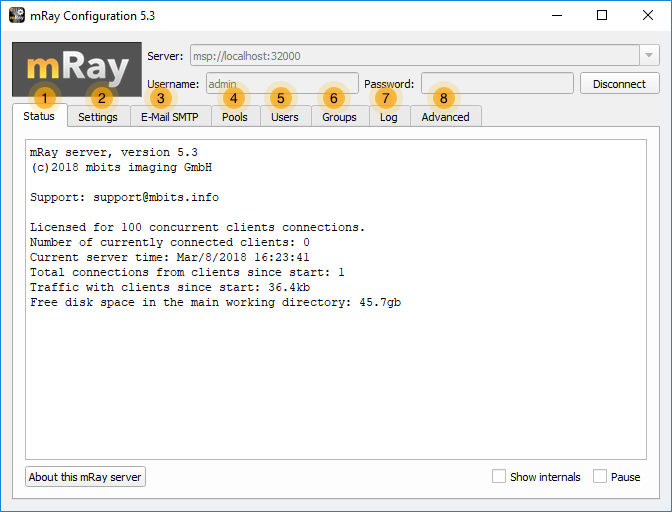
-
Status: Displays the current status of the server and other internal information.
-
Settings: Make general, globally applicable settings to the server.
-
E-mail SMTP: Here you can set up an outgoing e-mail server (SMTP) to send important messages via e-mail from mRay Server (e. g. PIN messages, expiring licenses, etc.).
-
Pools: A Pool corresponds to a DICOM node on the network. Pools contain user access rights for different data sources.
-
Users: Create, manage and delete users.
-
Groups: Create user access and chat groups.
-
Log: Displays the server log.
-
Advanced: You can adjust advanced settings here.
12.3. Status tab
The Status tab (see Configuration status with PIN information) shows license information, free space on the server and other internal information:
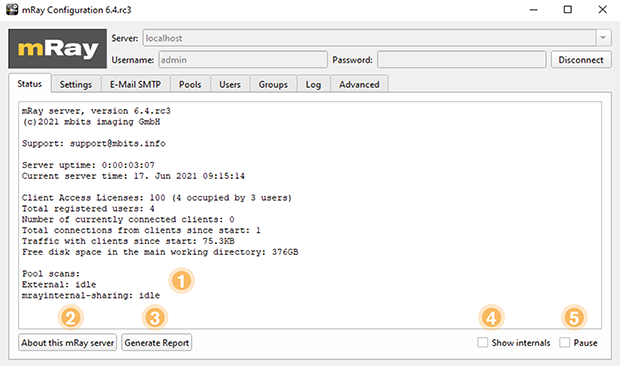
-
Shows the users PIN’s here if LDAP is active.
-
Opens the About dialog for the connected server that displays information about the manufacturer, used licenses, certification, etc. for the product and allows you to install updates or a license.
-
Opens the report generation dialog (see Generate statistics).
-
Activating the checkbox displays additional internal information of the server process.
-
Activating the checkbox pauses the information pane to be updated continuously.
13. General settings
This tab can be used to change various global settings (see Configuration settings).
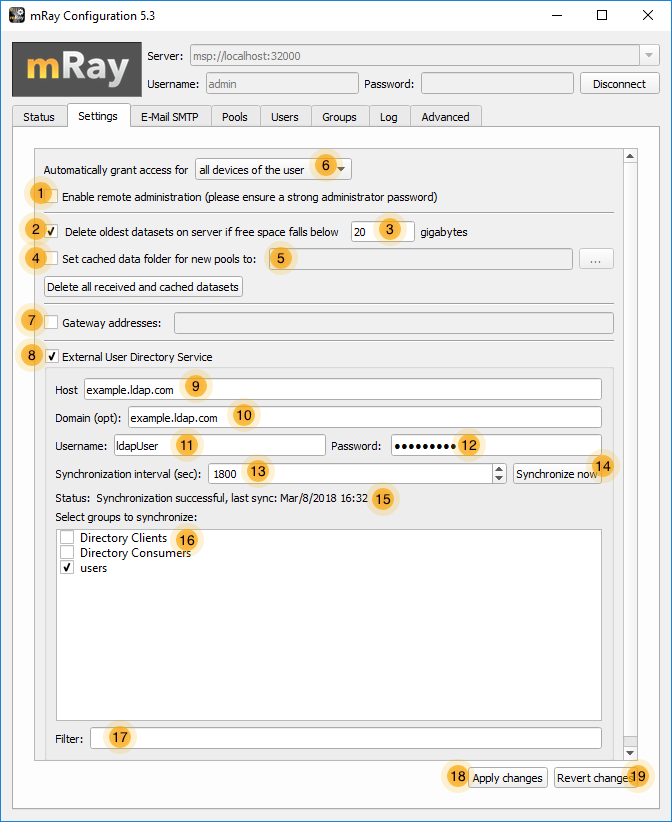
-
If checked the server can also be configured from a remote computer. Note: If your server is reachable from the internet, choosing this option will enable server configuration from any computer. Pay attention to provide a strong administrator password (min. 8 characters with uppercase and lowercase characters and numbers).
-
This checkbox activates the automatic deletion of the oldest records if the free memory falls under the provided limit on the installation disk. This ensures that the server is always ready for use. Please note that no data will be deleted from the PACS or similar, only the cached and encrypted DICOM data of the mRay server will be removed.
-
Specifies the desired free space in gigabytes if automatic deletion is activated.
-
If checked, the server uses an alternate working mRay path to store data like the cached and encrypted DICOM files there.
-
Set the alternate working folder. If enabled, the application data of newly created pools are stored within that path.
-
Choose which devices of a user do instantly get access without permission of the administrator.
-
If checked the server will connect to the gateway URL given in the input field. Input field: Set the address of the mRay Gateway installation the mRay Server should connect to. Make sure that the specified URL includes the port of the gateway. If you want your mRay Server to connect to multiple gateways you can specify their addresses by using a semicolon as a separator. For example: demo.mray.info:35000 or heidelberg.mbits.info:34999;test.mray.info:35001
-
If enabled, set the settings for the LDAP connection.
-
Fill in your IP address or server URL in this input field. If the server needs to be contacted via a special port you need to append a colon followed by the port. For example: ad.mbits.info:40000 or 192.168.1.100:40000
-
Fill in the domain which contains the users and groups. This input field is optional. If it is empty, the domain will be requested from the LDAP server. By setting the option "LDAP - Domain is DN" unequal 0 in the advanced options the fully qualified domain needs to be specified (e.g. dc=ad,dc=example,dc=com).
-
Insert your username here (optional in case of an anonymous login). By setting the options "LDAP - Username is DN" and/or "LDAP - Domain is DN" unequal 0 in the advanced options the fully qualified username needs to be specified. (e.g. cn=ldapuser,dc=ad,dc=example,dc=com).
-
Insert your password here.
-
Here you can input the time interval to synchronize with the LDAP server.
-
Press this button to synchronize the LDAP server immediately. Please note that all changes within the settings will be applied.
-
Shows the current synchronization state.
-
Here you can choose, which groups and their users will be stored in the user and groups directory of the mRay server.
-
With this input field you can search for special groups.
-
Apply the changed settings. Note: Changes to the fields 1-7 must always be confirmed with this button.
-
Revert the changed settings.
|
For the integration scenario 'mRay server with worldwide access' you can configure the server worldwide with the mRay configuration and internet access. Please be cautious to use a strong administrator password (at least 8 characters, upper/lower case and digits). |
|
Please note that if you have activated the LDAP synchronization (see point 8), you must also configure an existing sender e-mail account (see chapter Email SMTP). This is required to send an automatic PIN notification to an mRay LDAP user to be authenticated if requested. A new PIN request is usually made in the case of a first authentication or a password change. |
|
The expire time of a PIN that is requested by an LDAP user can be manually set using the Advanced options using the 'LDAP - Time after PIN expires' setting. |
|
Changes need to be confirmed before they are applied. |
14. Pool management
The Pool Tab (Pool list) lets you create, edit and delete „pools“:
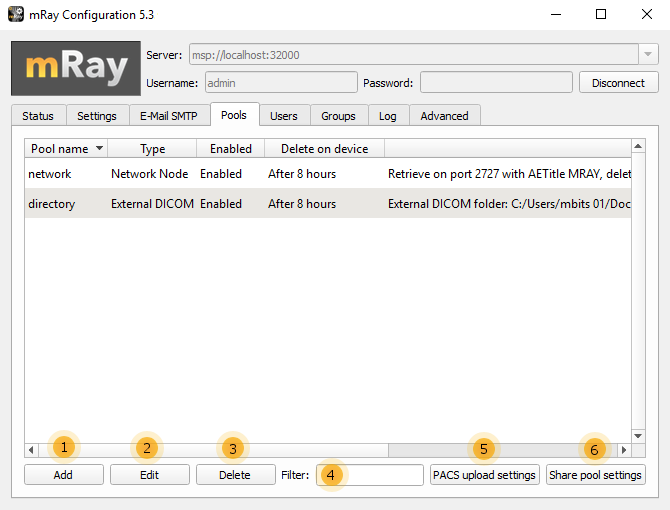
-
Adds a new pool.
-
„Edit“ or double clicking a pool will open the edit dialog.
-
Deletes the selected pool.
-
Filter the pool list using free text.
-
This button will only be shown if your license includes the PACS upload feature. This features enables structured reports, presentation states and photos to be stored in a PACS. Push this button to open the PACS Upload Pool settings. You can enter your PACS address, port and AET in the dialog. Note that you may need to enter the upload pool as a DICOM send entity in your PACS (depending on the PACS software).
-
Press this button to edit the share pool settings. This pool is used to host shared data. If your license doesn’t include the PACS upload feature then all datasets created on client devices (i.e. structured reports, presentation states and photos) will be stored in this pool. Otherwise only internally shared presentation states will be stored in the share pool.
There are three different types of pools: Network Nodes, Query/Retrieve pools and External DICOM Folders.
14.1. Network node pool
A Network node pool is equivalent to a regular DICOM node (see Network node pool configuration).
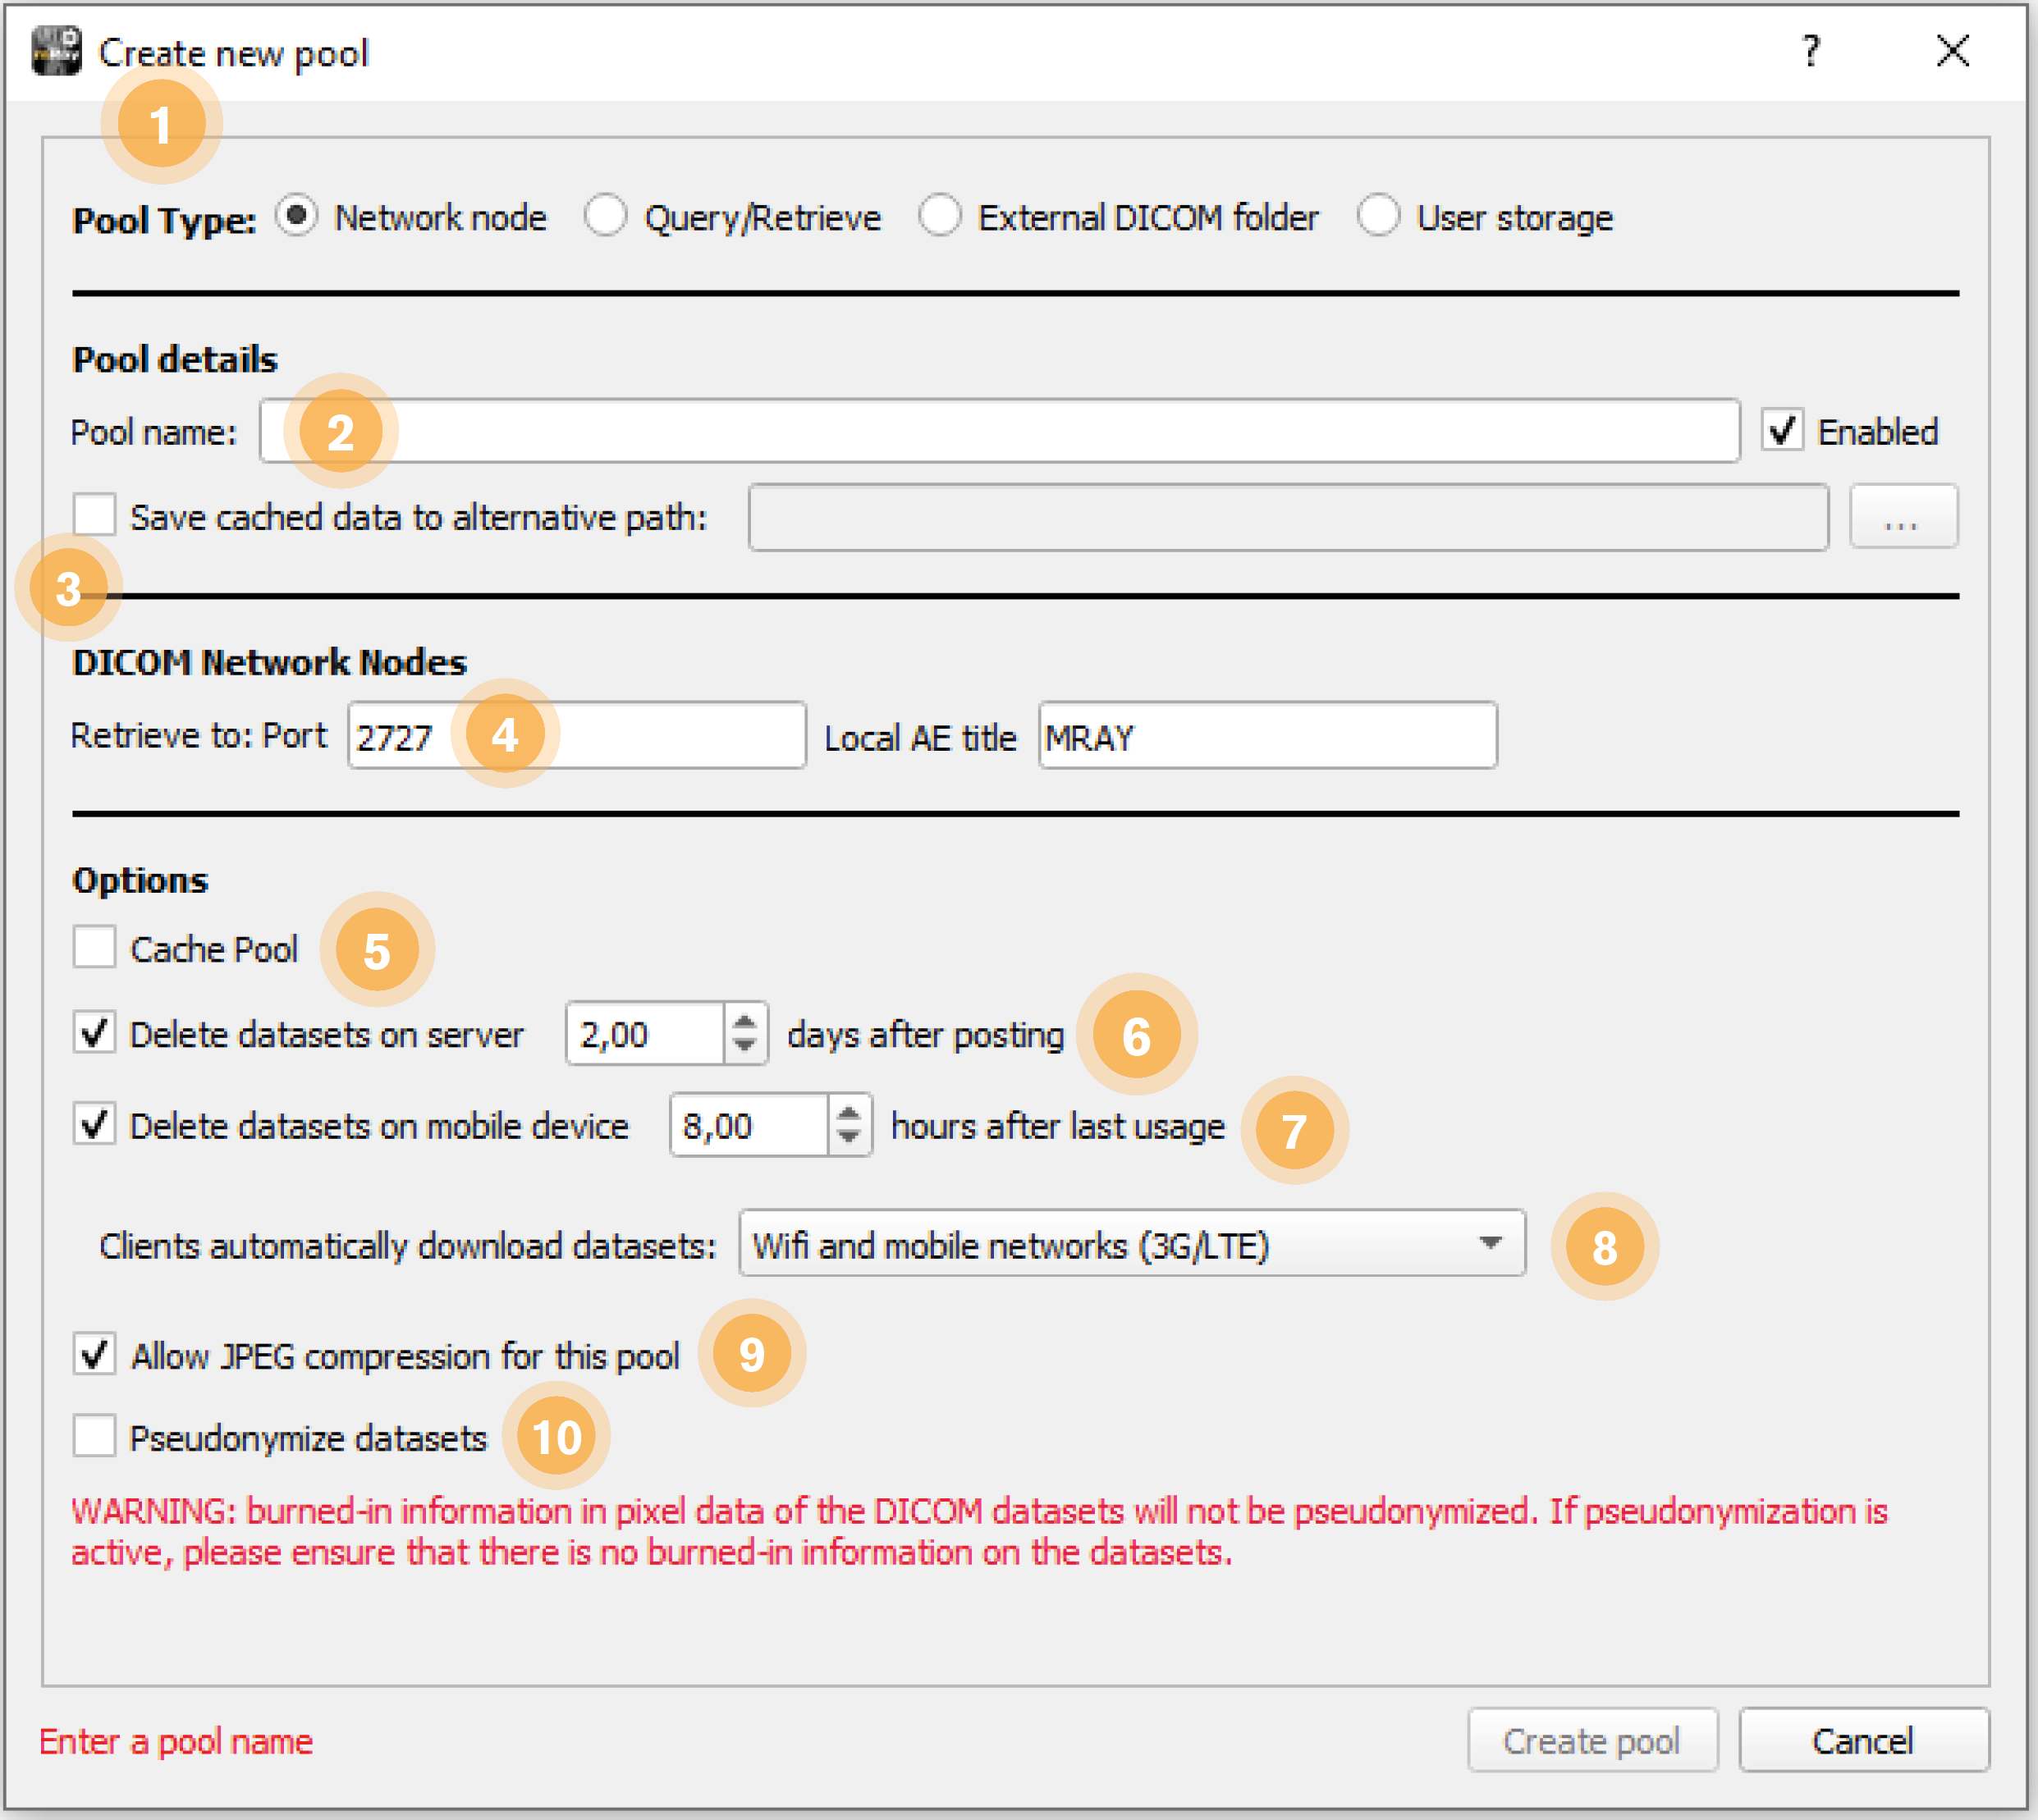
-
Select which type of pool you want to create:
-
Network node: Represents an ordinary PACS node to which you can send data from a PACS.
-
Query/Retrieve: Represents a pool with which you can send search queries to a PACS.
-
External DICOM folder: Access to an arbitrary folder where files will be automatically uploaded.
-
User Storage: Access to an arbitrary folder where files uploaded by a user will be stored.
-
-
Specify a name for the pool. The checkbox lets you activate or deactivate the pool (without deleting it).
-
If activated, a different working path for the new pool can be specified where all data is stored. This will overwrite the general setting on the working path (if set). Please note, however, that the settings concerning free space and limits will apply to that path.
-
Enables a DICOM C-Store SCP listener through which you can send DICOM data from your PACS to your pool. A TCP input port and an application entity title (AET) for the DICOM C-Store SCP listener must be set for this pool.
-
Activates the temporary storage of already retrieved or transmitted datasets, which speeds up a later search for these datasets. When this option is activated, new incoming datasets are not automatically placed in the user’s inbox, but must first be moved to the inbox via the search tab.
-
Delete incoming datasets from the server after the specified number of days. You can also enter floating-point numbers (e.g. „2.5“).
-
Let’s you specify how long local data on the client app will be available.
-
Activates/deactivates the “auto download” feature. If enabled here and in the client app, incoming datasets will automatically be downloaded to the client app.
-
Activates/ deactivates JPEG Compression for this pool.
-
The mRay server can optionally remove patient information from incoming image data (“Pseudonymization”). Warning
|
Burned-in information cannot be removed. Please ensure, that there is no personal information directly encoded in your images when using this feature. |
|
JPEG compression is only supported for images with maximum 12 bits and lossless compression is only supported for images with maximum 16 bits. |
14.2. Query/Retrieve pool
A Query/Retrieve Pool is created to search a PACS from within the client app (see Query/Retrieve pool configuration).
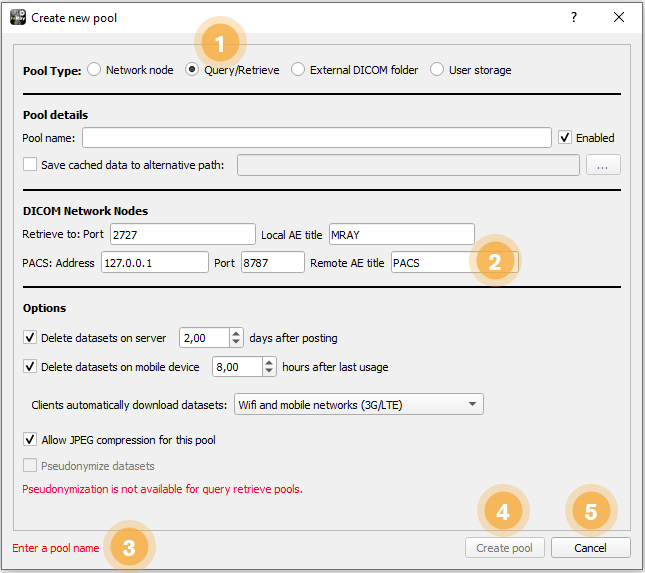
Any function already described in 'Network Node Pool' will not be explained. These are the different form fields to consider:
-
Sets the pool type to Query/Retrieve
-
Specify first the local port and the AET for the mRay server (i.e. the AET which will receive answers from your PACS). On the second line specify the connection details of your PACS.
-
Status field containing potential errors.
-
Creates the pool.
-
Abort pool creation.
14.3. External DICOM folder pool
An external DICOM folder (see External [abbr-dicom] pool configuration) imports dicom data from a local directory.

All other fields are explained in previous chapter 'Network node pool'.
-
Sets the pool type to External DICOM folder
-
Specify the external DICOM directory path from which the data will be automatically loaded.
14.4. User Storage
The pool type User Storage (see User Storage configuration) serves as target storage for uploaded data via the upload service.
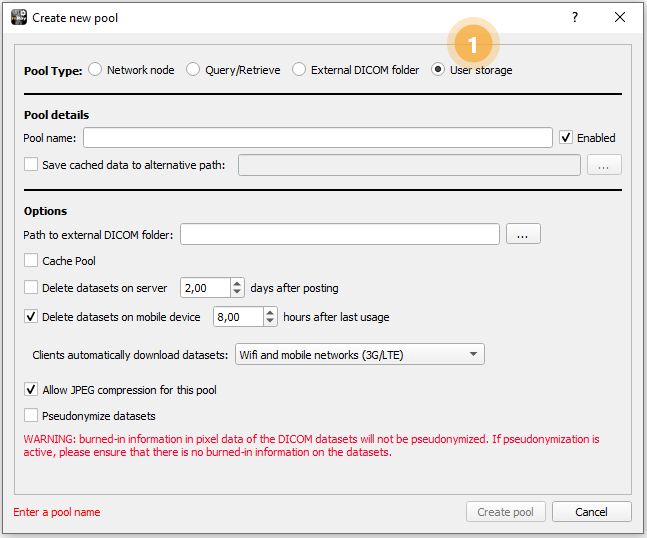
All other the data fields have already been explained before. Similar to External DICOM folder, only an external directory for user data should be specified.
-
Sets the pool type to User Storage
-
Specify the external DICOM directory path for data uploaded through mRay.
15. User management
The Users tab lets you add, edit and delete users (User list).
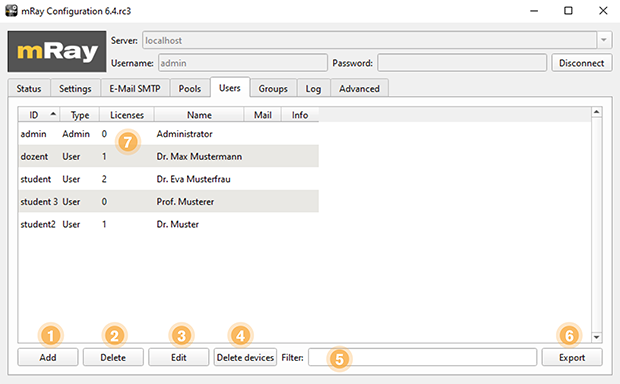
-
Add a new user.
-
Delete the selected user.
-
Edit the selected user. Or double click the user item in the list.
-
Delete devices deletes all devices from selected user.
-
Filter the users list using free text.
-
Via Export users can be exported as .csv file.
-
Licenses shows the number of licenses obtained by this user. Each device will obtain one license.
15.1. Create and edit users
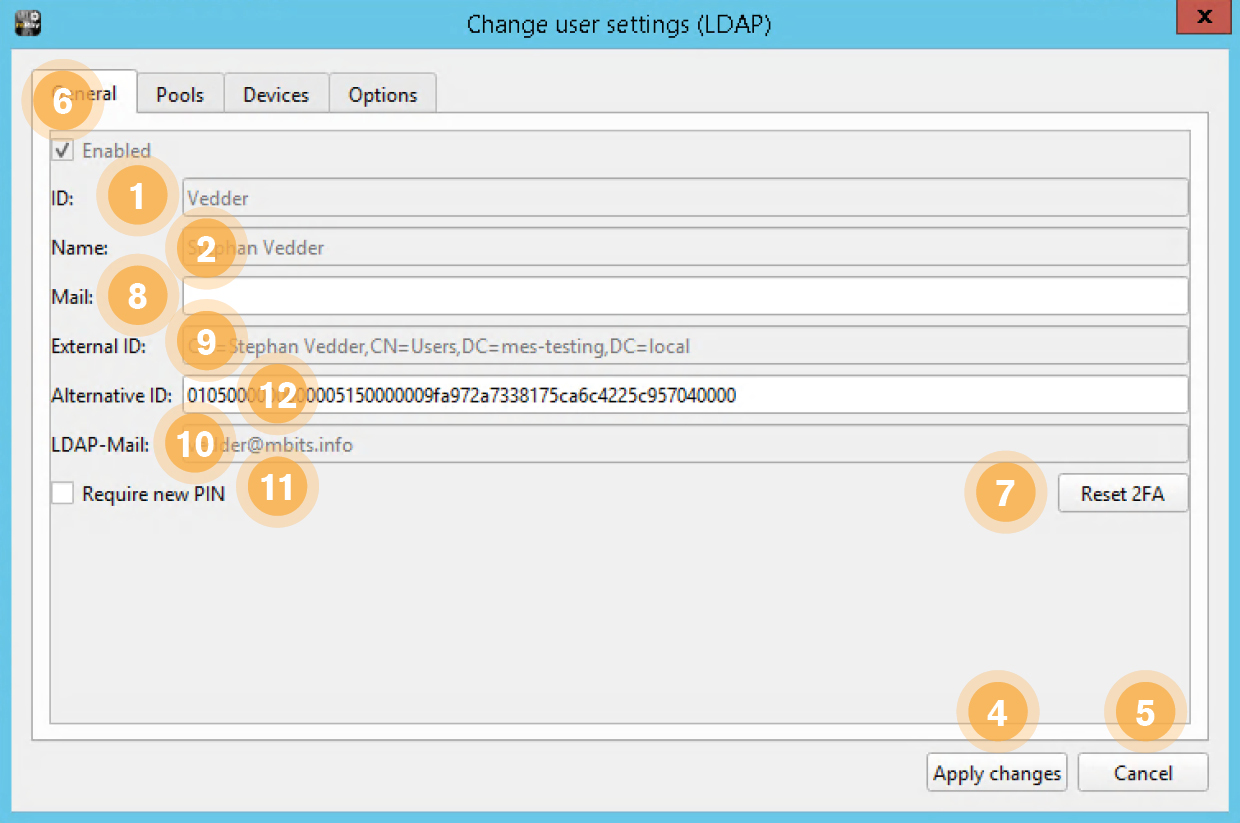
After clicking “add” or “edit” the user dialog will come up (Manual users: see User configuration, LDAP synchronized users: see [abbr-ldap] user configuration).
15.1.1. "General Settings"-Tab
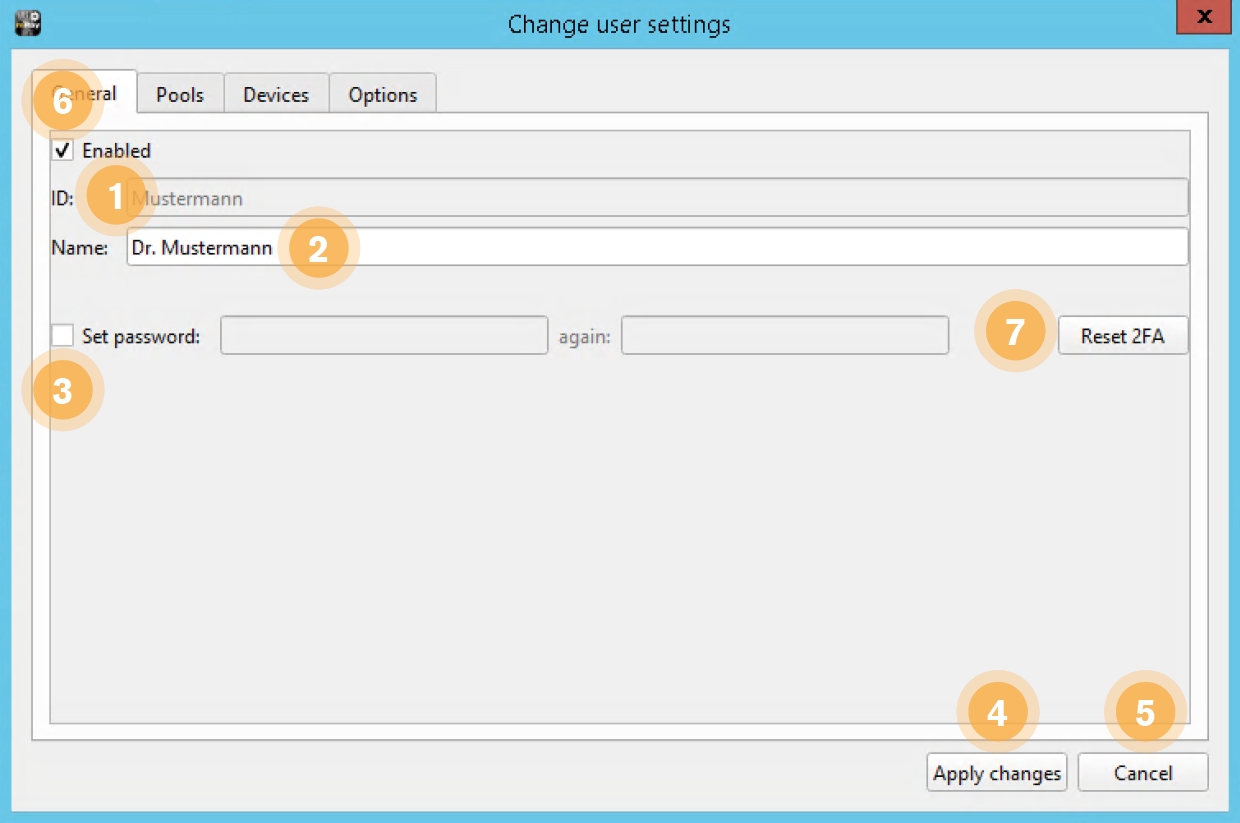
-
ID: Specify the login name.
-
Name: Complete name of the user (will be shown to others in chat-rooms).
-
Set password: Enter and confirm the password for the user.
-
Add user / Apply changes: Creates the user with the configured properties or adds the user if it does not exist yet, or saves all changes made to the user.
-
Cancel: Cancels the creation of the user or discards all changes.
-
Enabled: Enables or disables the user (Disabled users can not connect to the server).
-
Reset 2FA: Disable two-factor-authentication for the current user.
-
Mail: Alternate e-mail address(es). Will be preferred against LDAP mail (see point 18) in case of e-mail notifications. You can use the semicolon separator (;) to specify multiple e-mail addresses.
-
External ID: DN (short: distinguished name), i.e. unique identifier within the LDAP directory, of the synchronized LDAP user.
-
LDAP-Mail: LDAP synchronized e-mail address of an LDAP user. Is used for the automatic dispatch of important e-mail notifications from mRay. Can be overwritten by an alternative e-mail address (see item 16).
-
Require new PIN: Triggers a new PIN request for a user, so that the most recent LDAP password is queried again (for example, in case of password change).
-
Alternative ID: If a change is made in the Active Directory, e.g. the user moves to another subtree, this field can be used as an additional identification key to identify the user in addition to the DN. A unique LDAP attribute should be used, which does not change over the life cycle of the user (example: objectSid).
For LDAP users, the data and state is synchronized with your Active Directory and therefore cannot be changed via the user interface. For this reason some of the input fields are grayed out or disabled.
|
Please take care of the characters used for the password as they might not be available on the keyboard of a mobile device. |
|
Manual users can still be maintained and used alongside LDAP synchronized users. |
15.1.2. "Pool-Access"-Tab
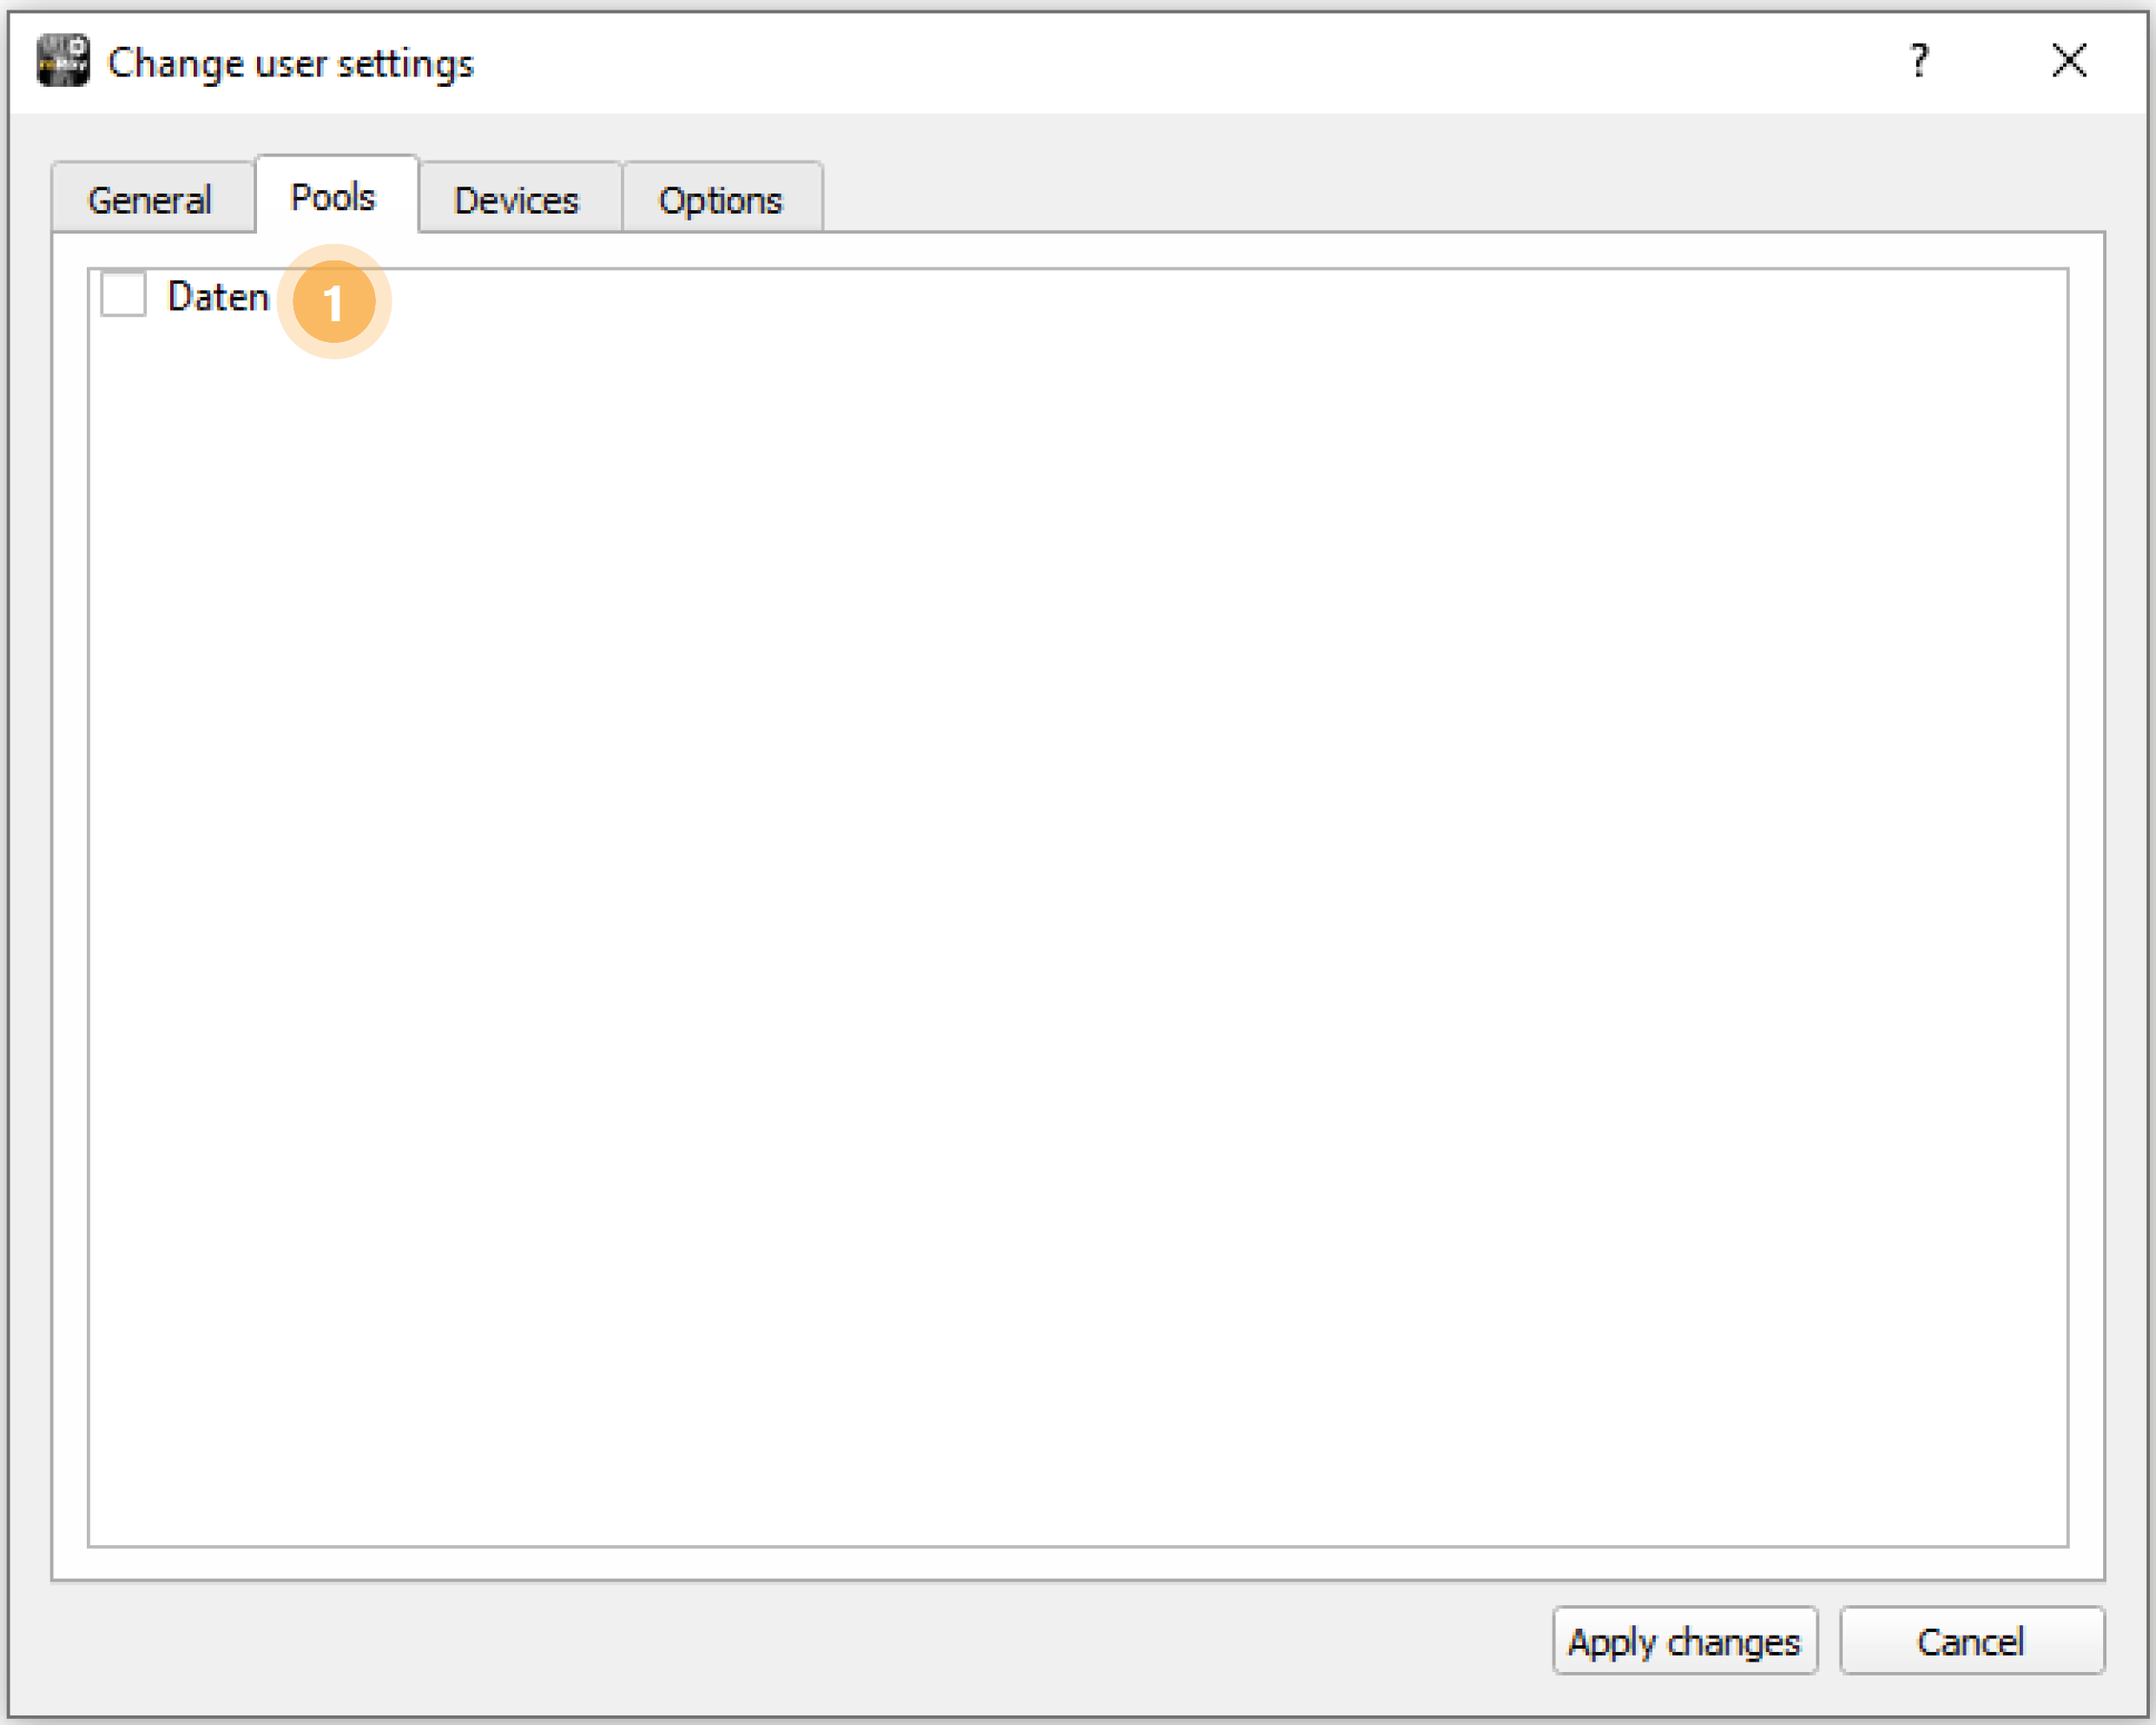
-
Check all pools the user should have access to.
15.1.3. "Devices"-Tab
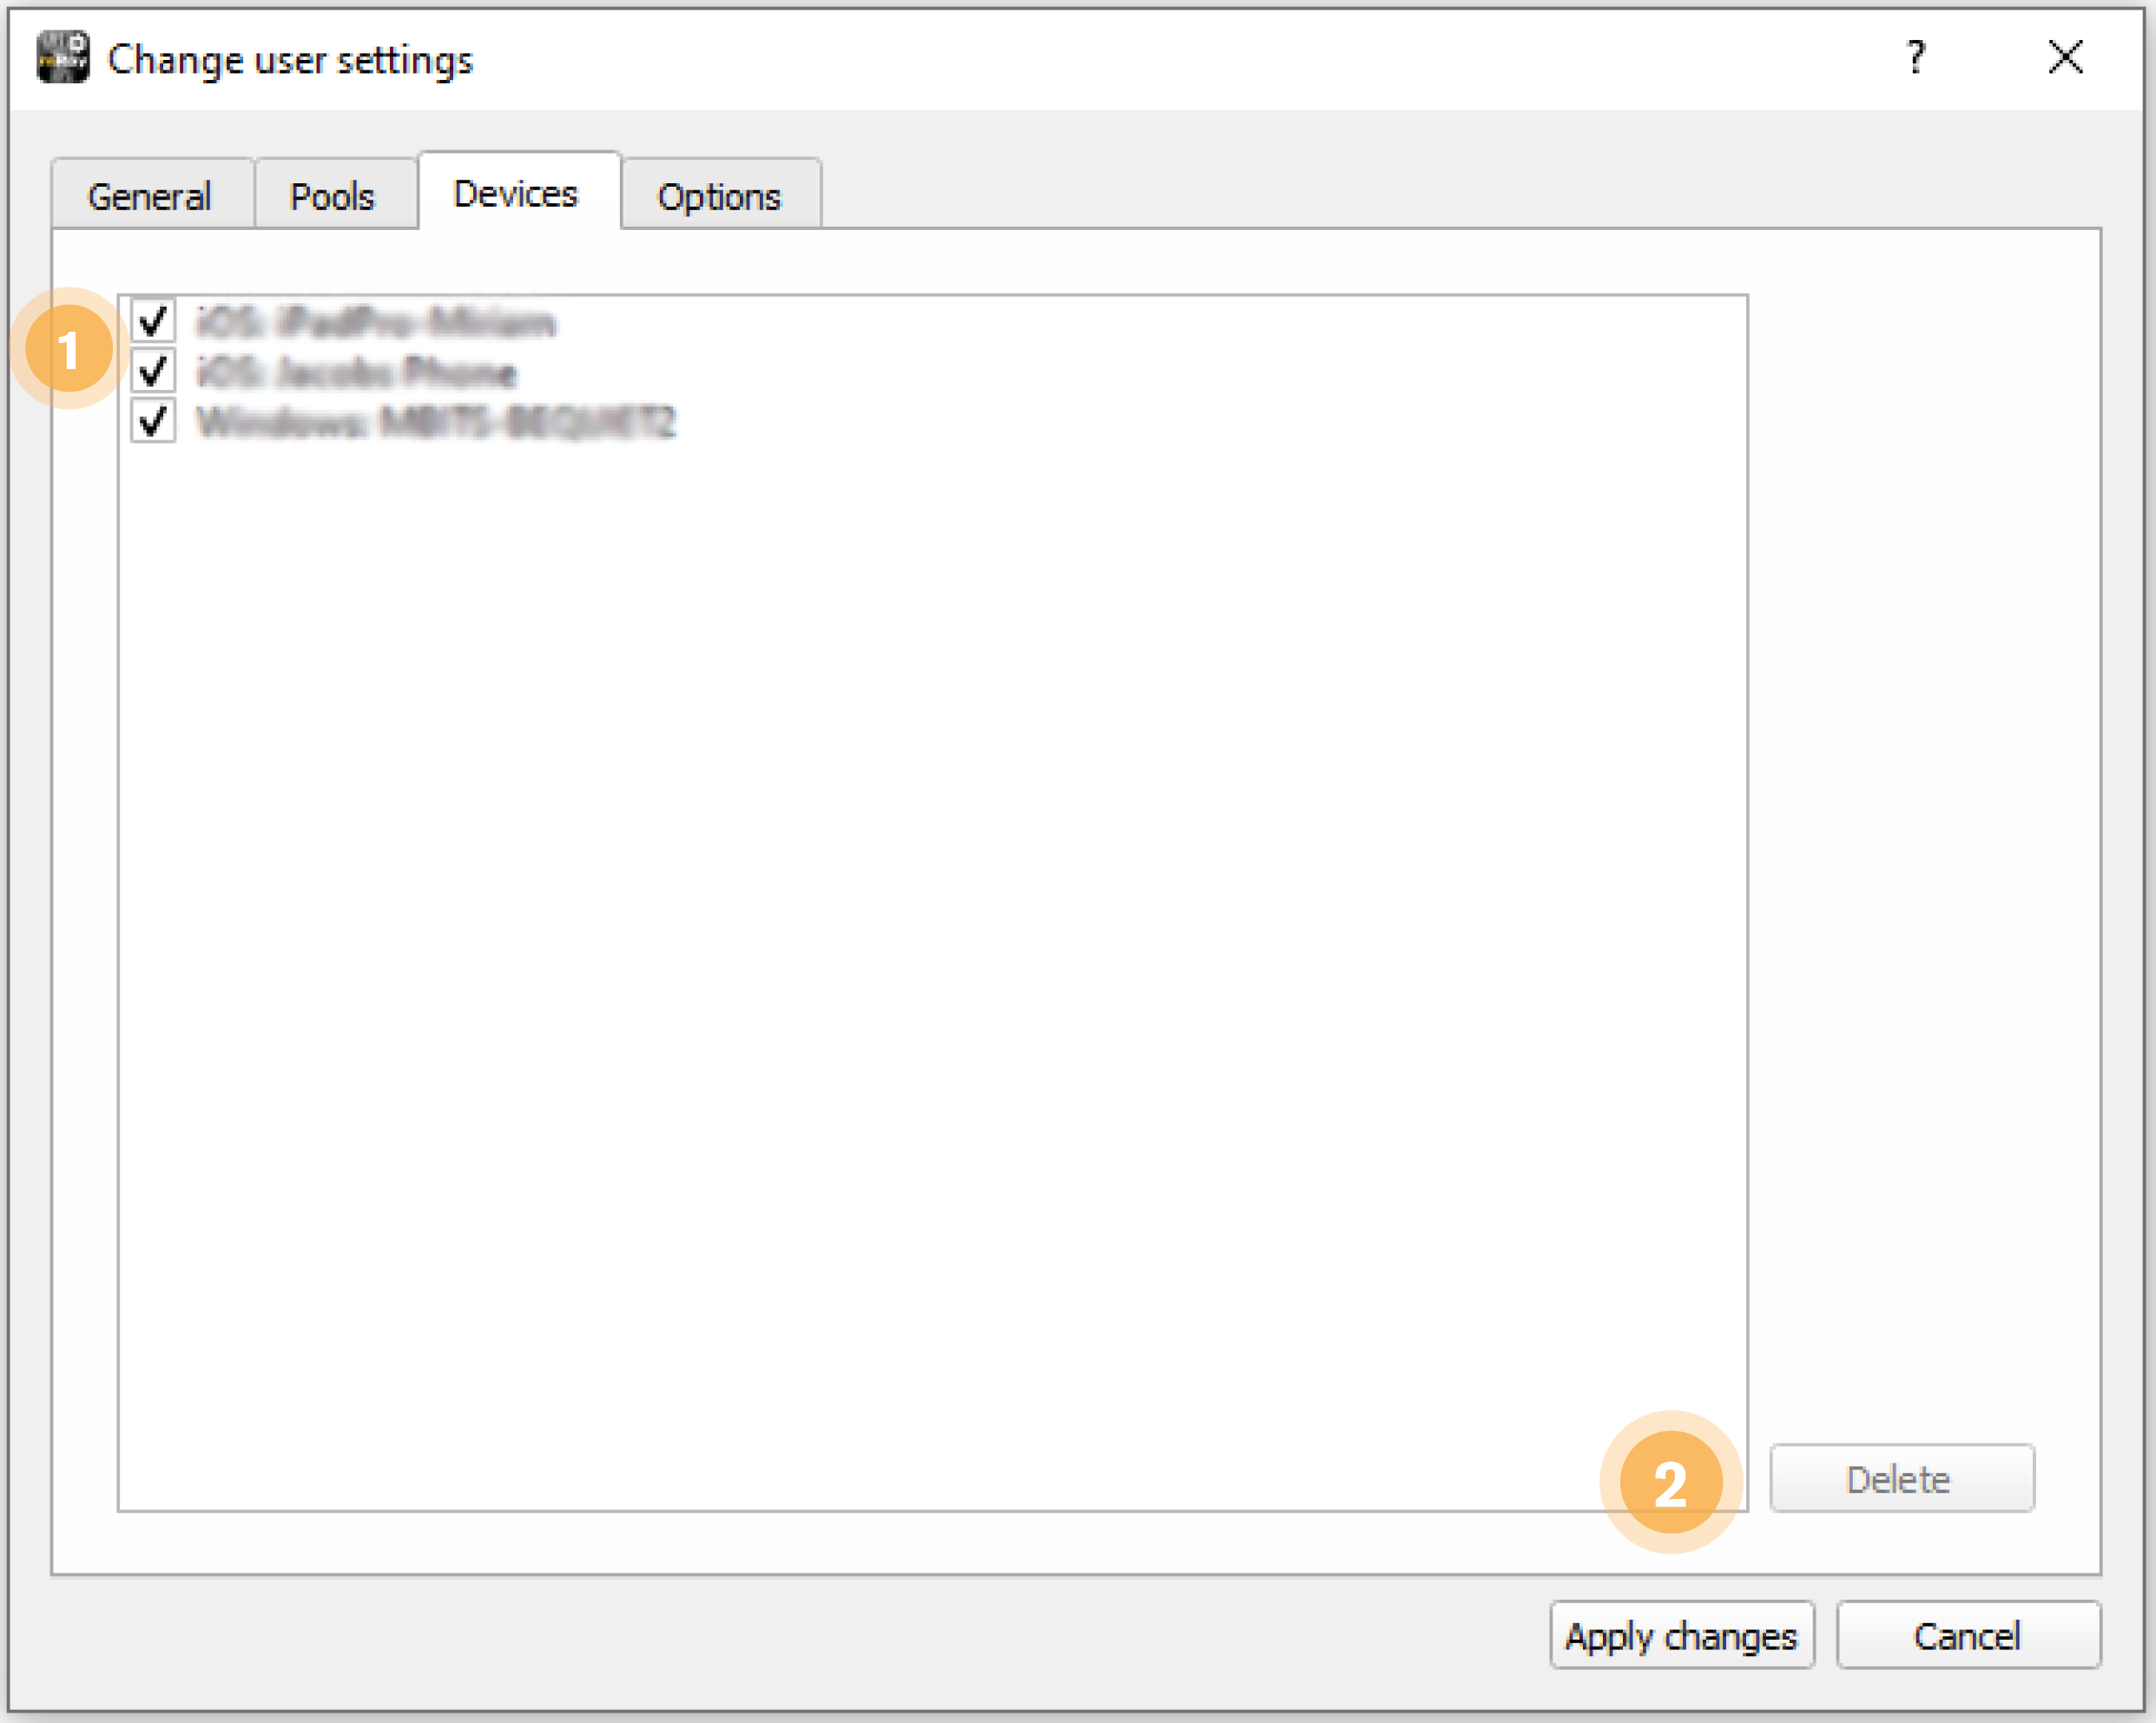
-
The devices list cannot be edited by hand. It lists all device IDs with which the user has been registered. By selecting/deselecting the checkbox of a device ID access can be allowed/prohibited a user’s device.
-
Deletes a selected device.
15.1.4. "Options"-Tab
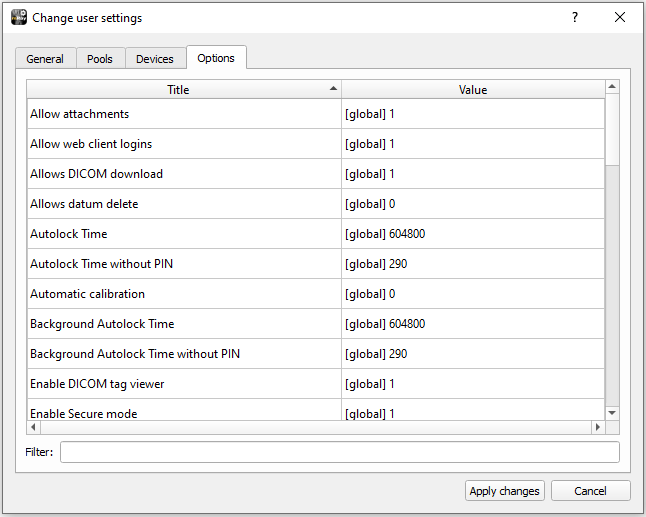
Use the Options tab to set additional settings and/or permissions for each user. A brief description of the purpose of an option can be found in the respective options dialog that opens when you edit an option.
16. Group management
The Groups tab (see Group list) lets you manage user groups. You can grant access to certain pools for a group of users at the same time. Furthermore, a group also represents a chat-room within the client app (if enabled).
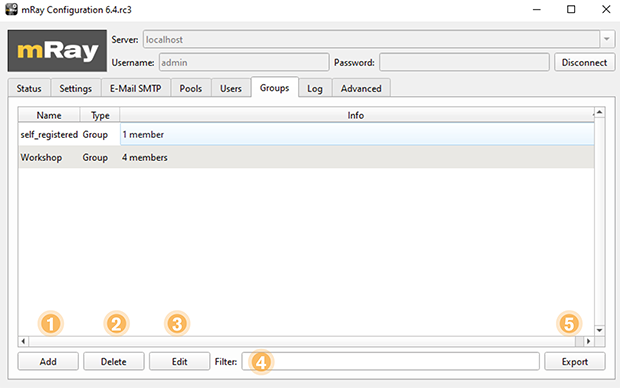
-
Adds a group.
-
Edit the selected group. Alternatively double click on the group item in the list.
-
Delete the selected group.
-
Search the group list using free text.
-
Via Export groups can be exported as .csv file.
16.1. Add or edit groups
The group dialog (see Group configuration) will show up after clicking add/edit in the groups tab.
16.1.1. "General Settings"-Tab
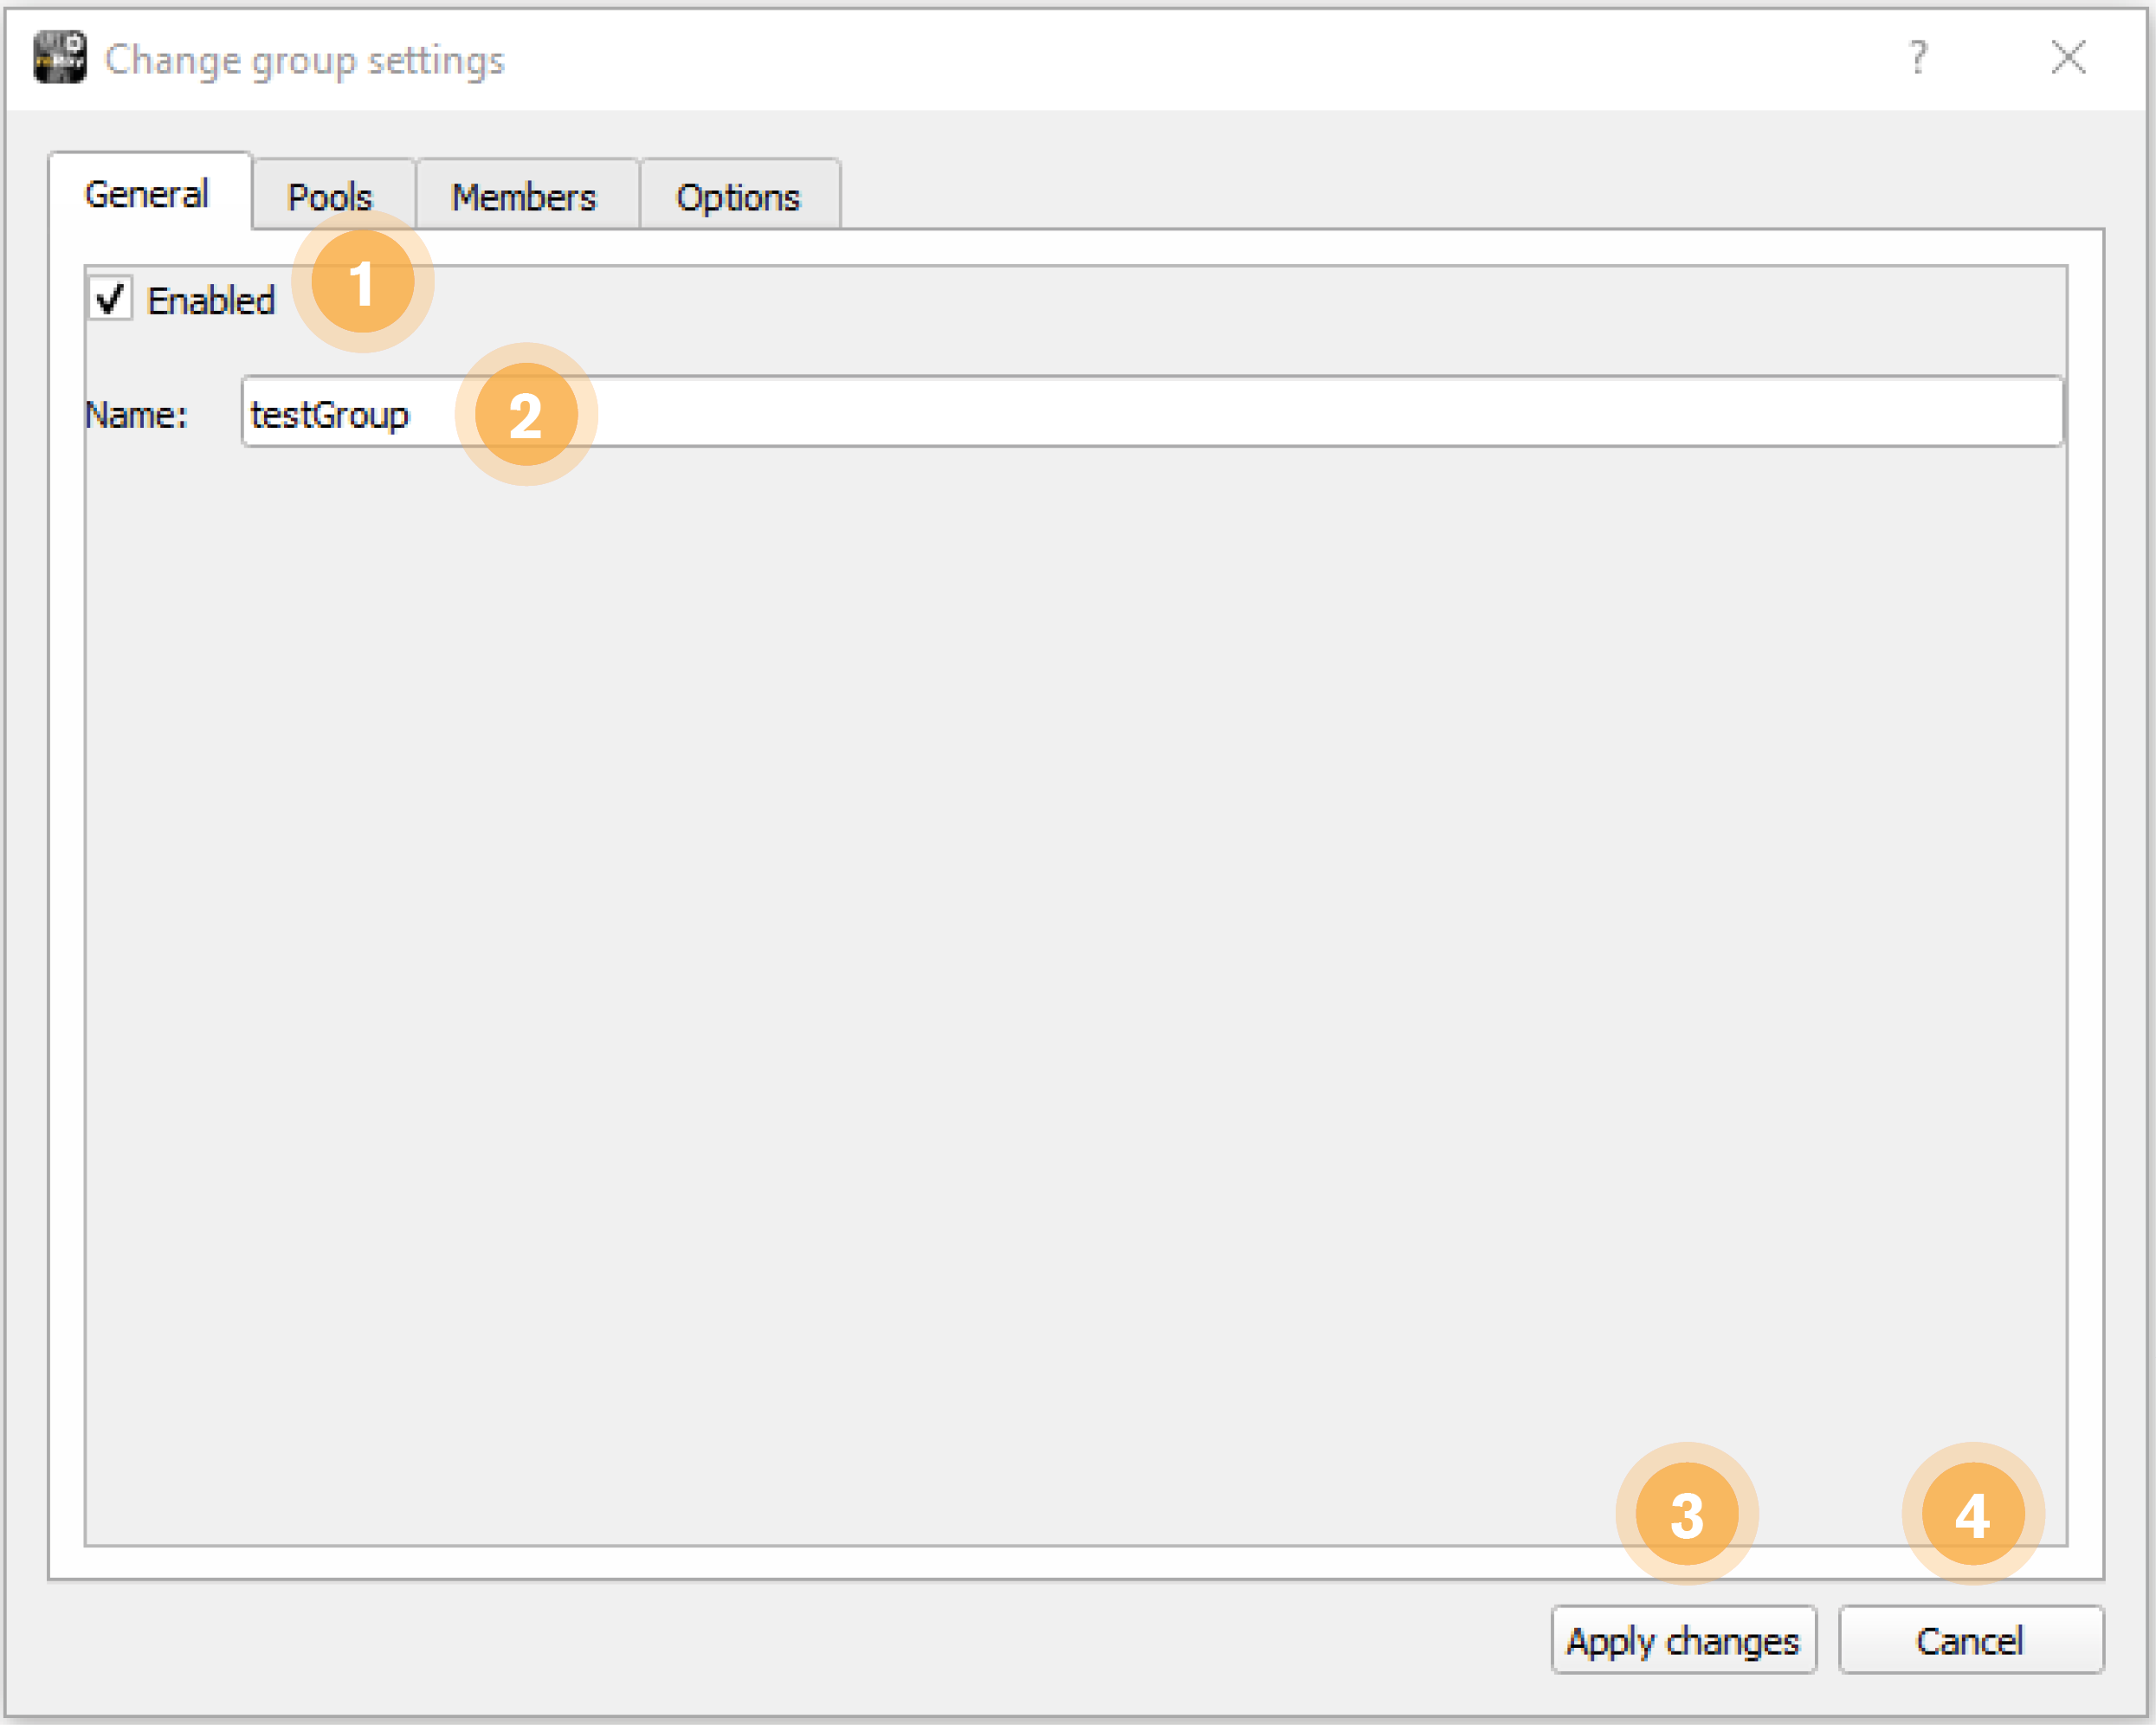
-
Enabled: Enables or disables the Group. (Disabled groups are not connected to the server).
-
Name: Provide a name for the group. Please note that this will also be the name of the chat-room.
-
Apply changes: Apply changes.
-
Cancel: Abort changes.
-
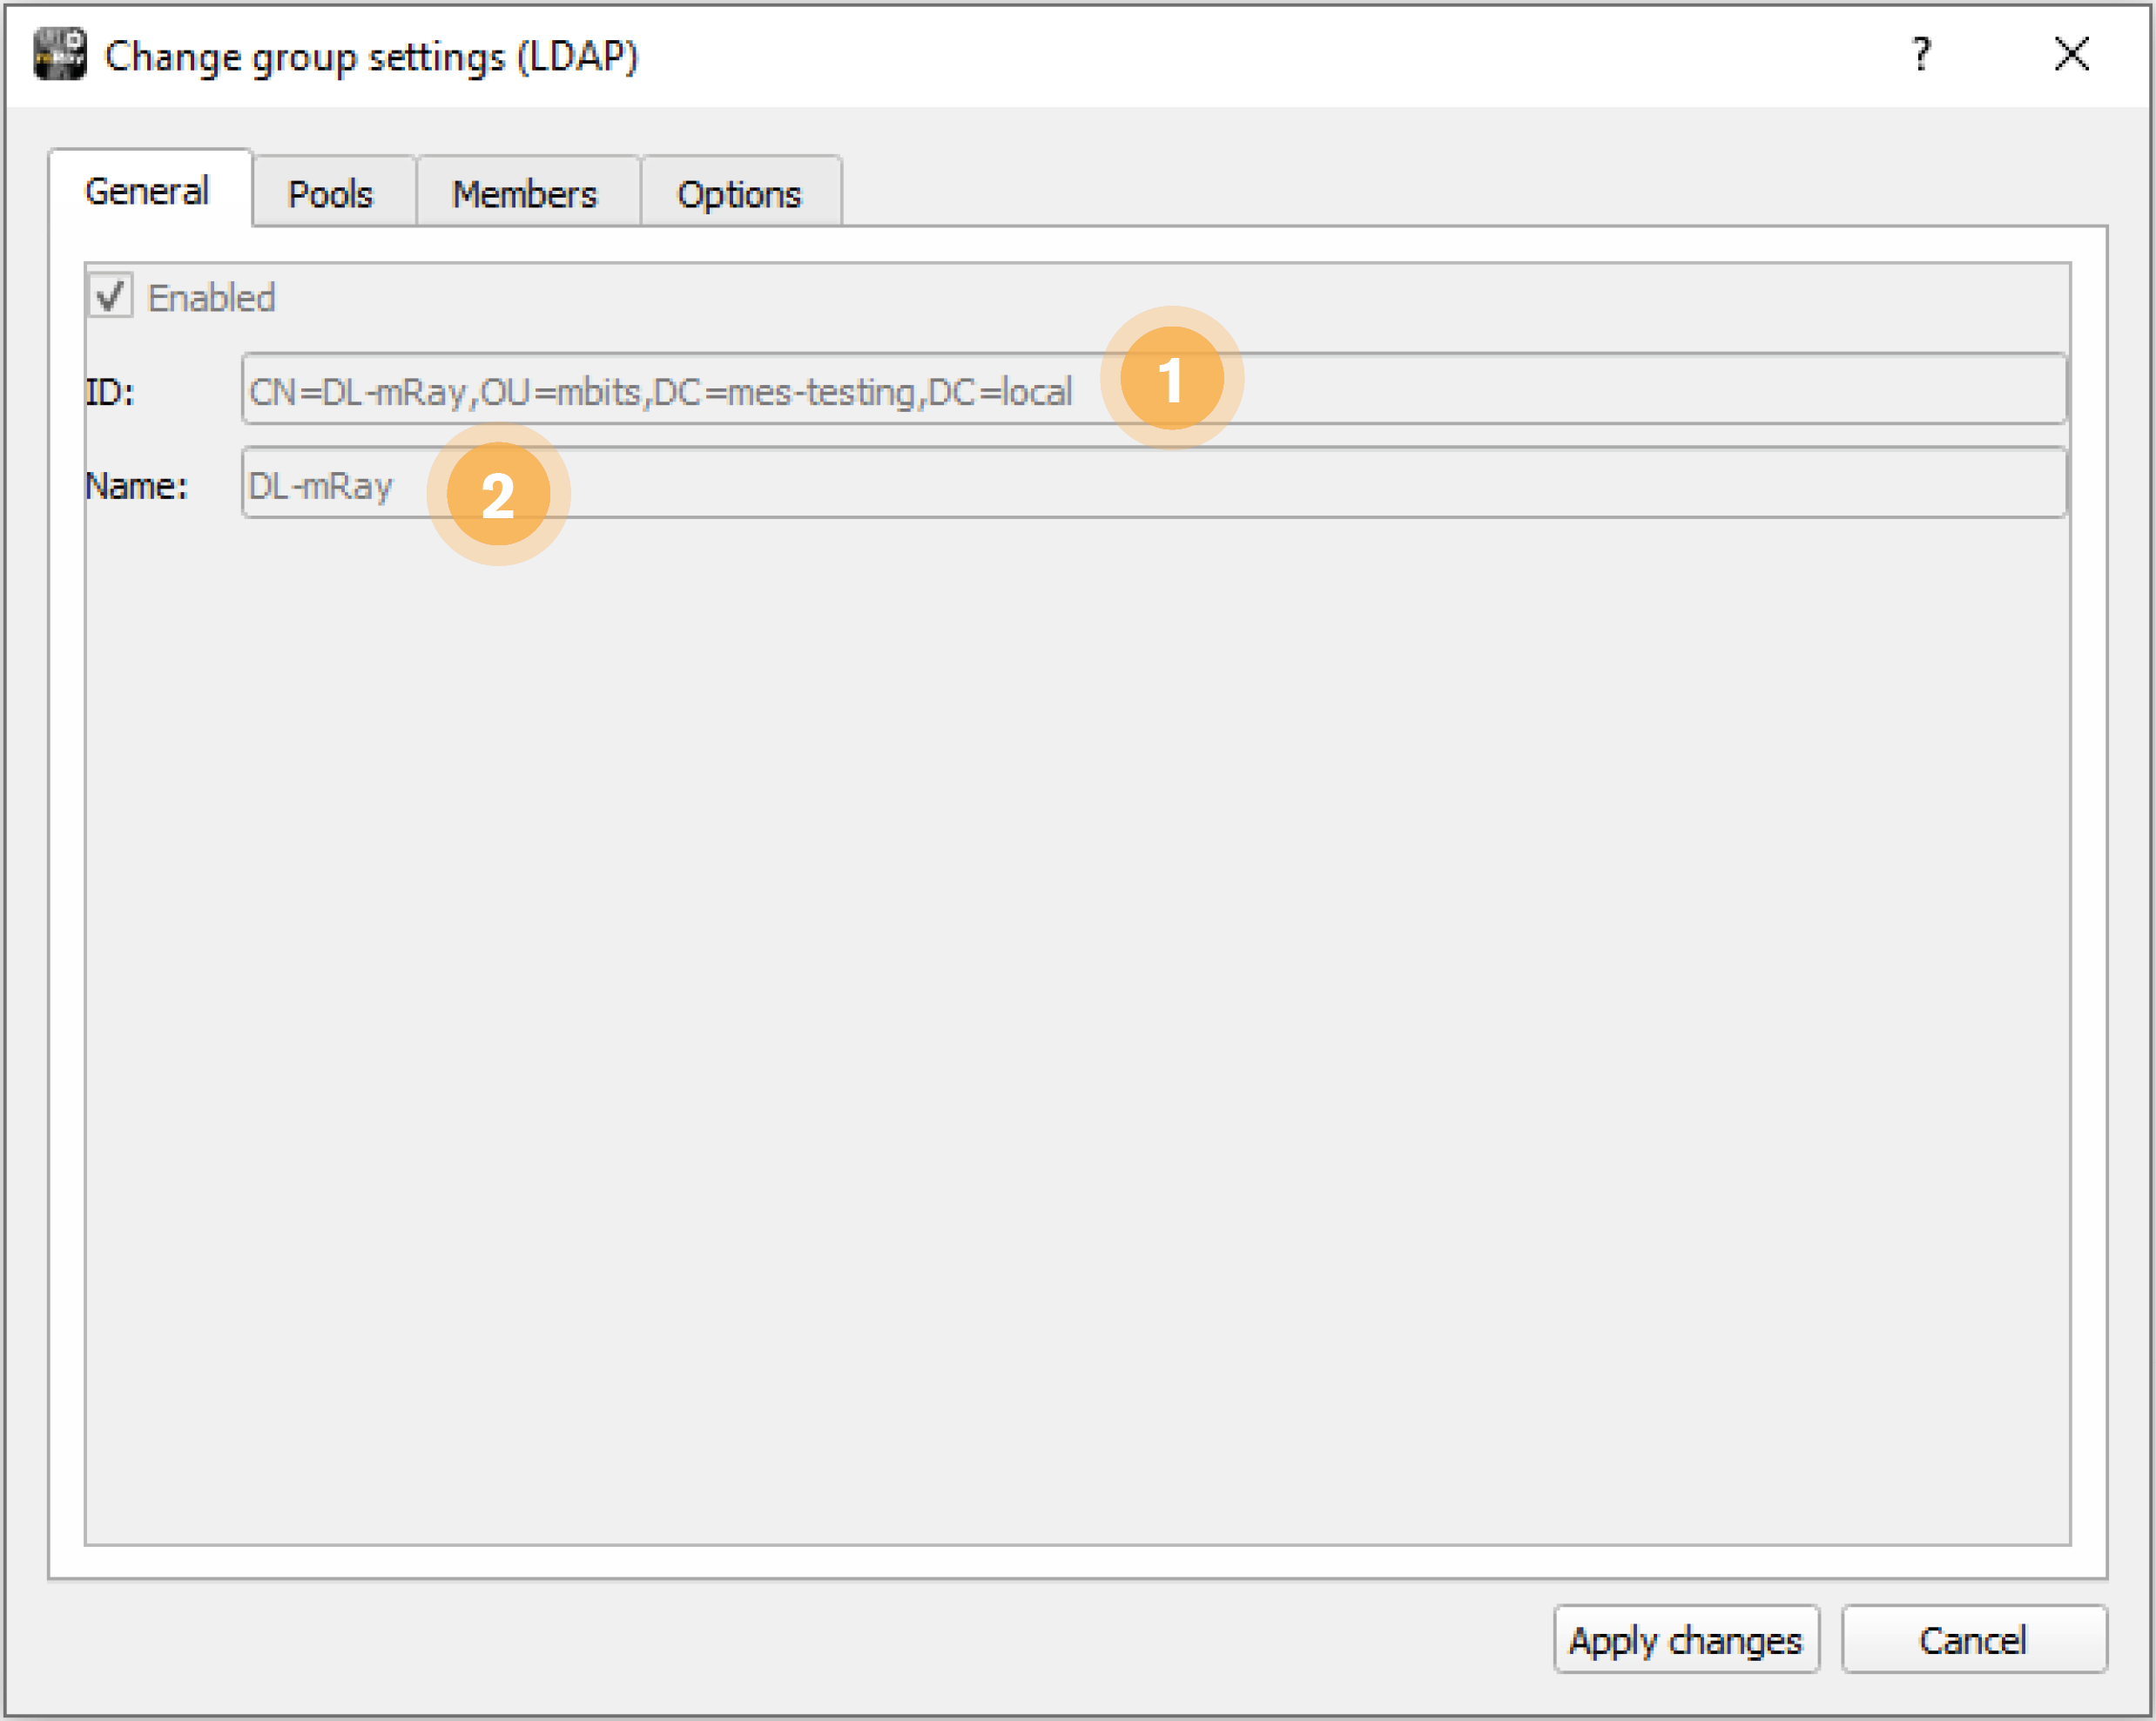
ID: DN (Distinguished Name) of the LDAP group
-
Name: Name of the group
For LDAP groups, the data and state are synchronized based on your Active Directory and therefore cannot be changed via the user interface. For this reason the input fields are grayed out or disabled.
16.1.2. "Pool-Access"-Tab
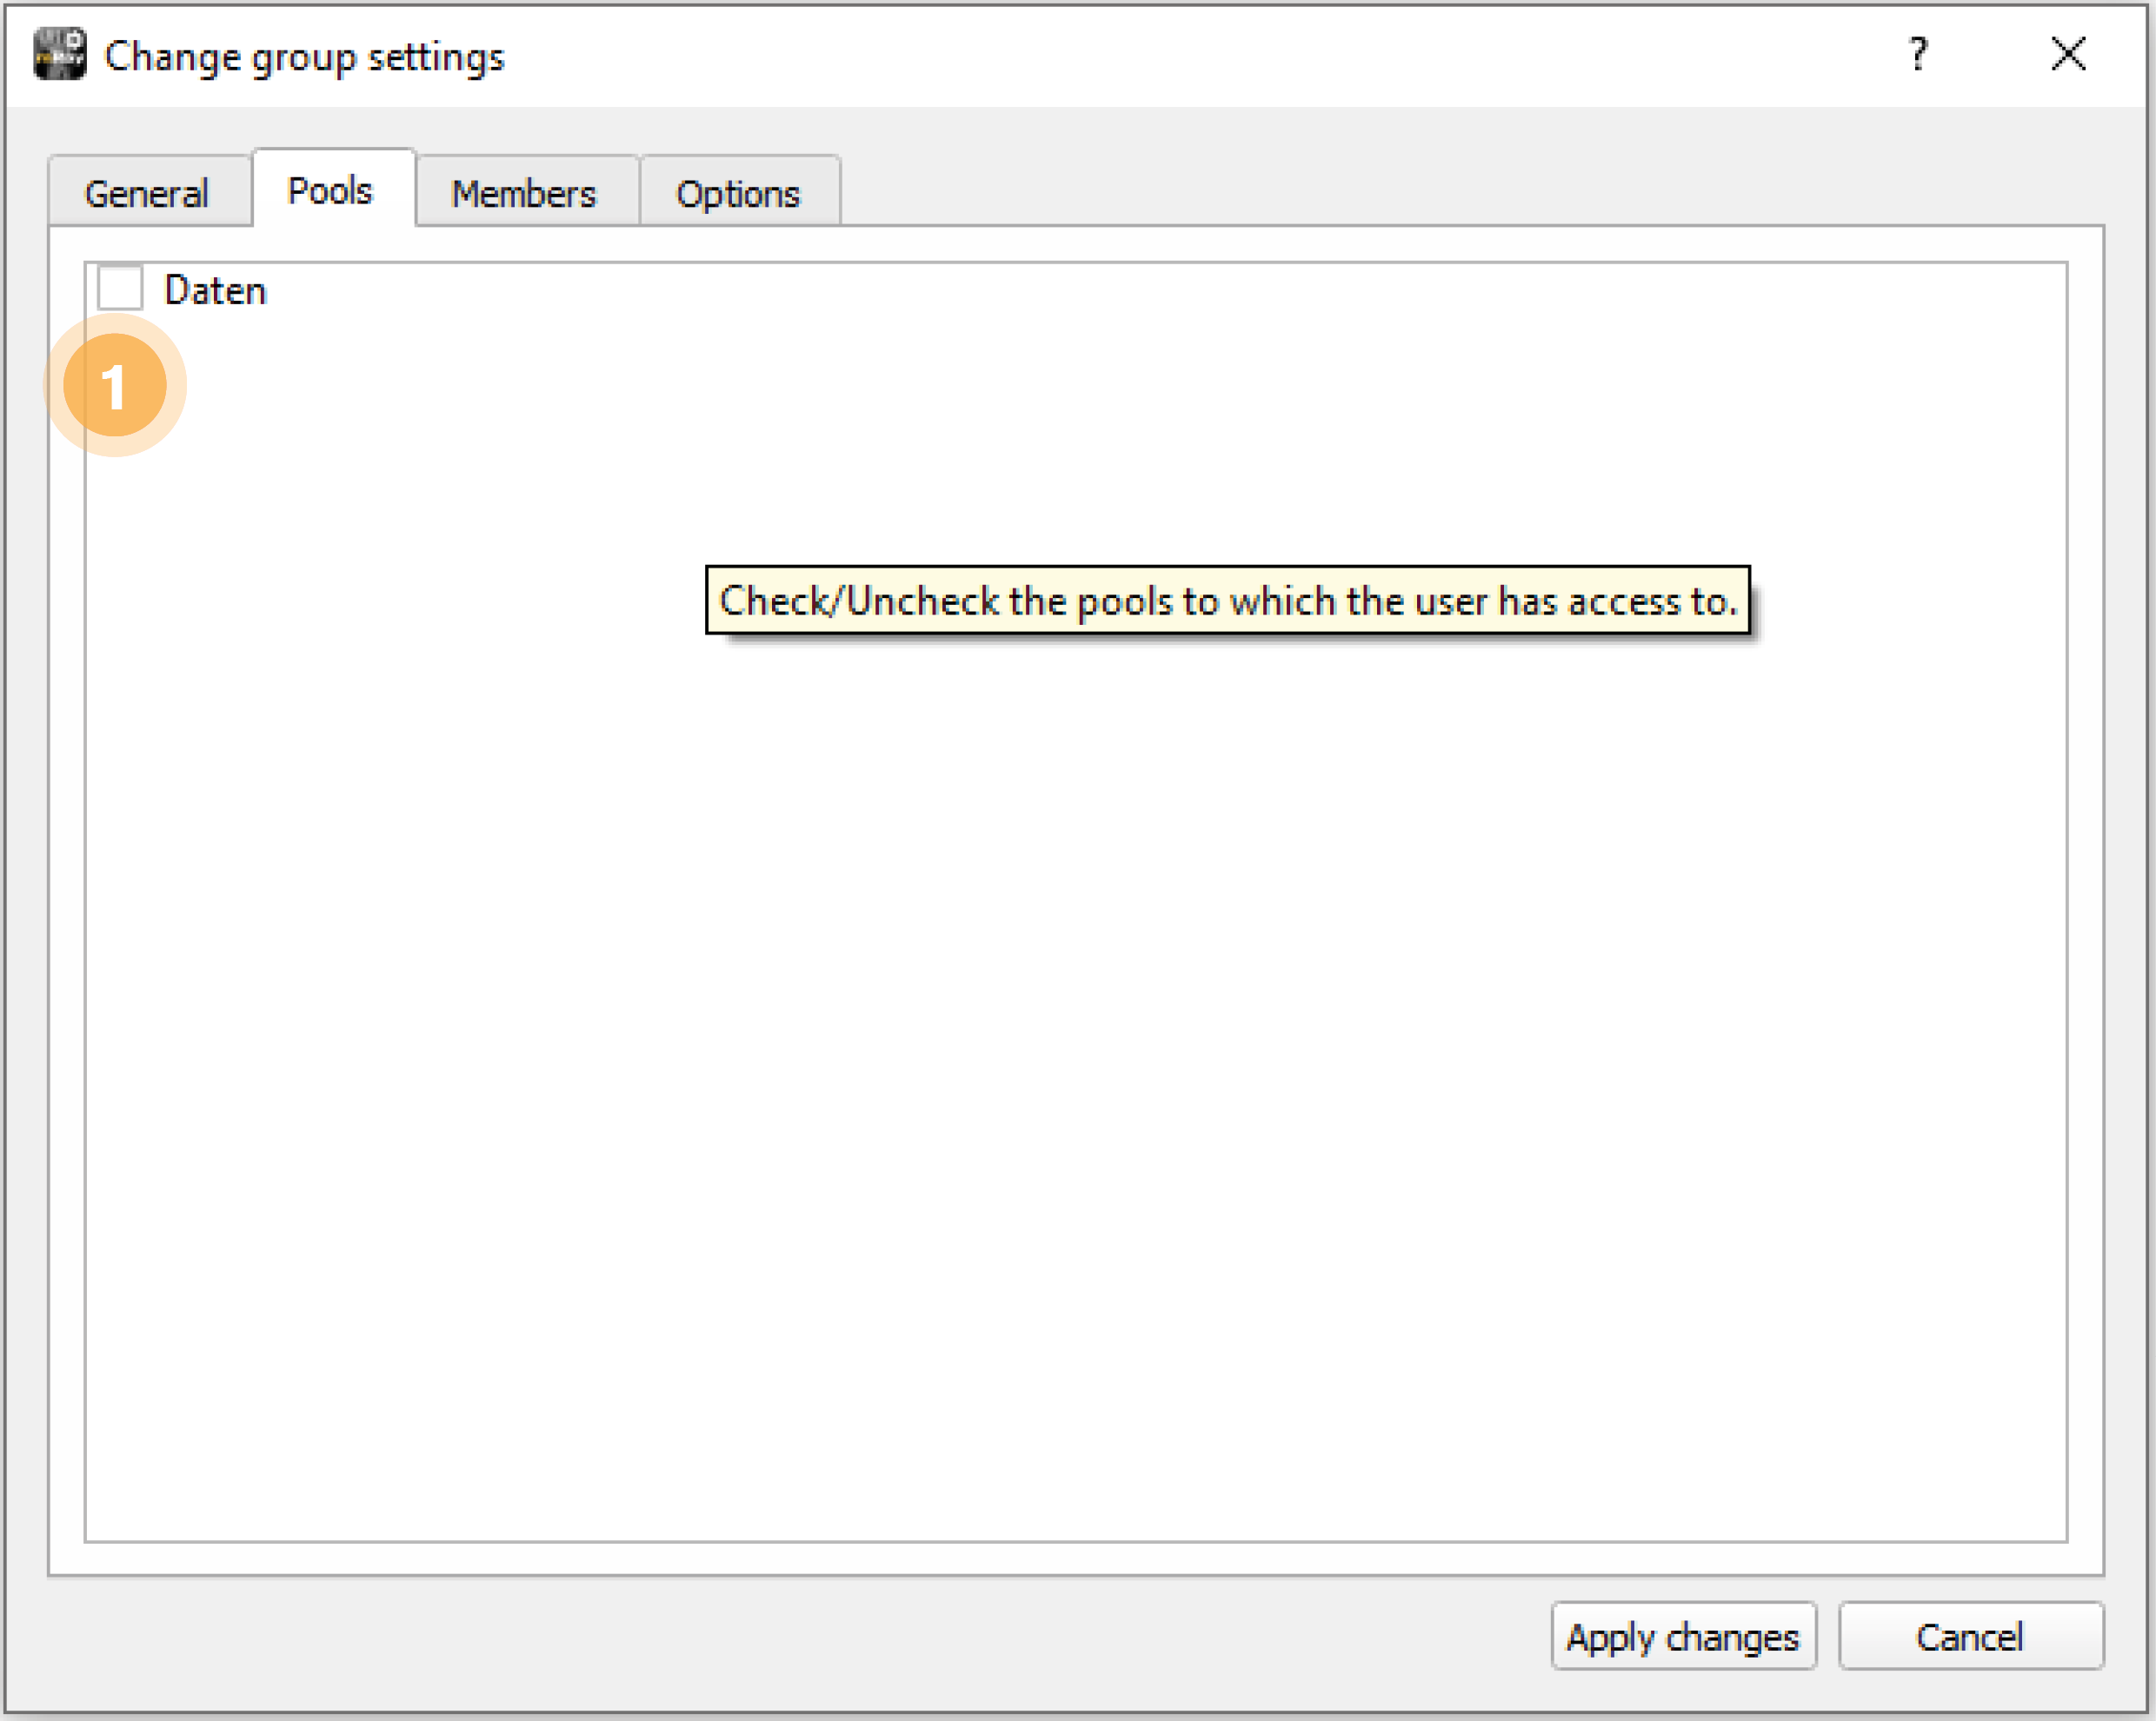
-
Enable access rights of the group for one or several pools.
16.1.3. "Group-Members"-Tab
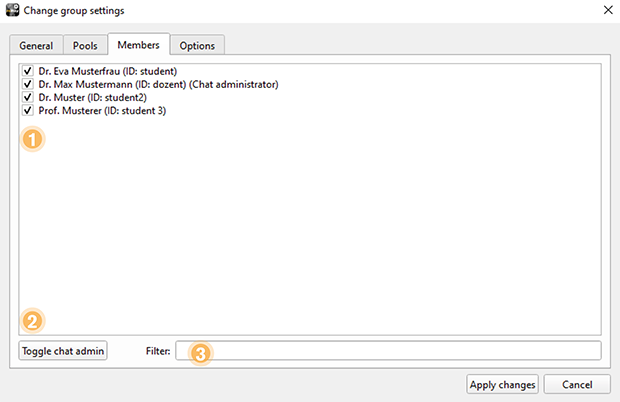
-
Add users to the group or remove them.
-
Sets and removes Chat Administrator of the group. It is possible to set more than one Admin.
-
Search group members using free text.
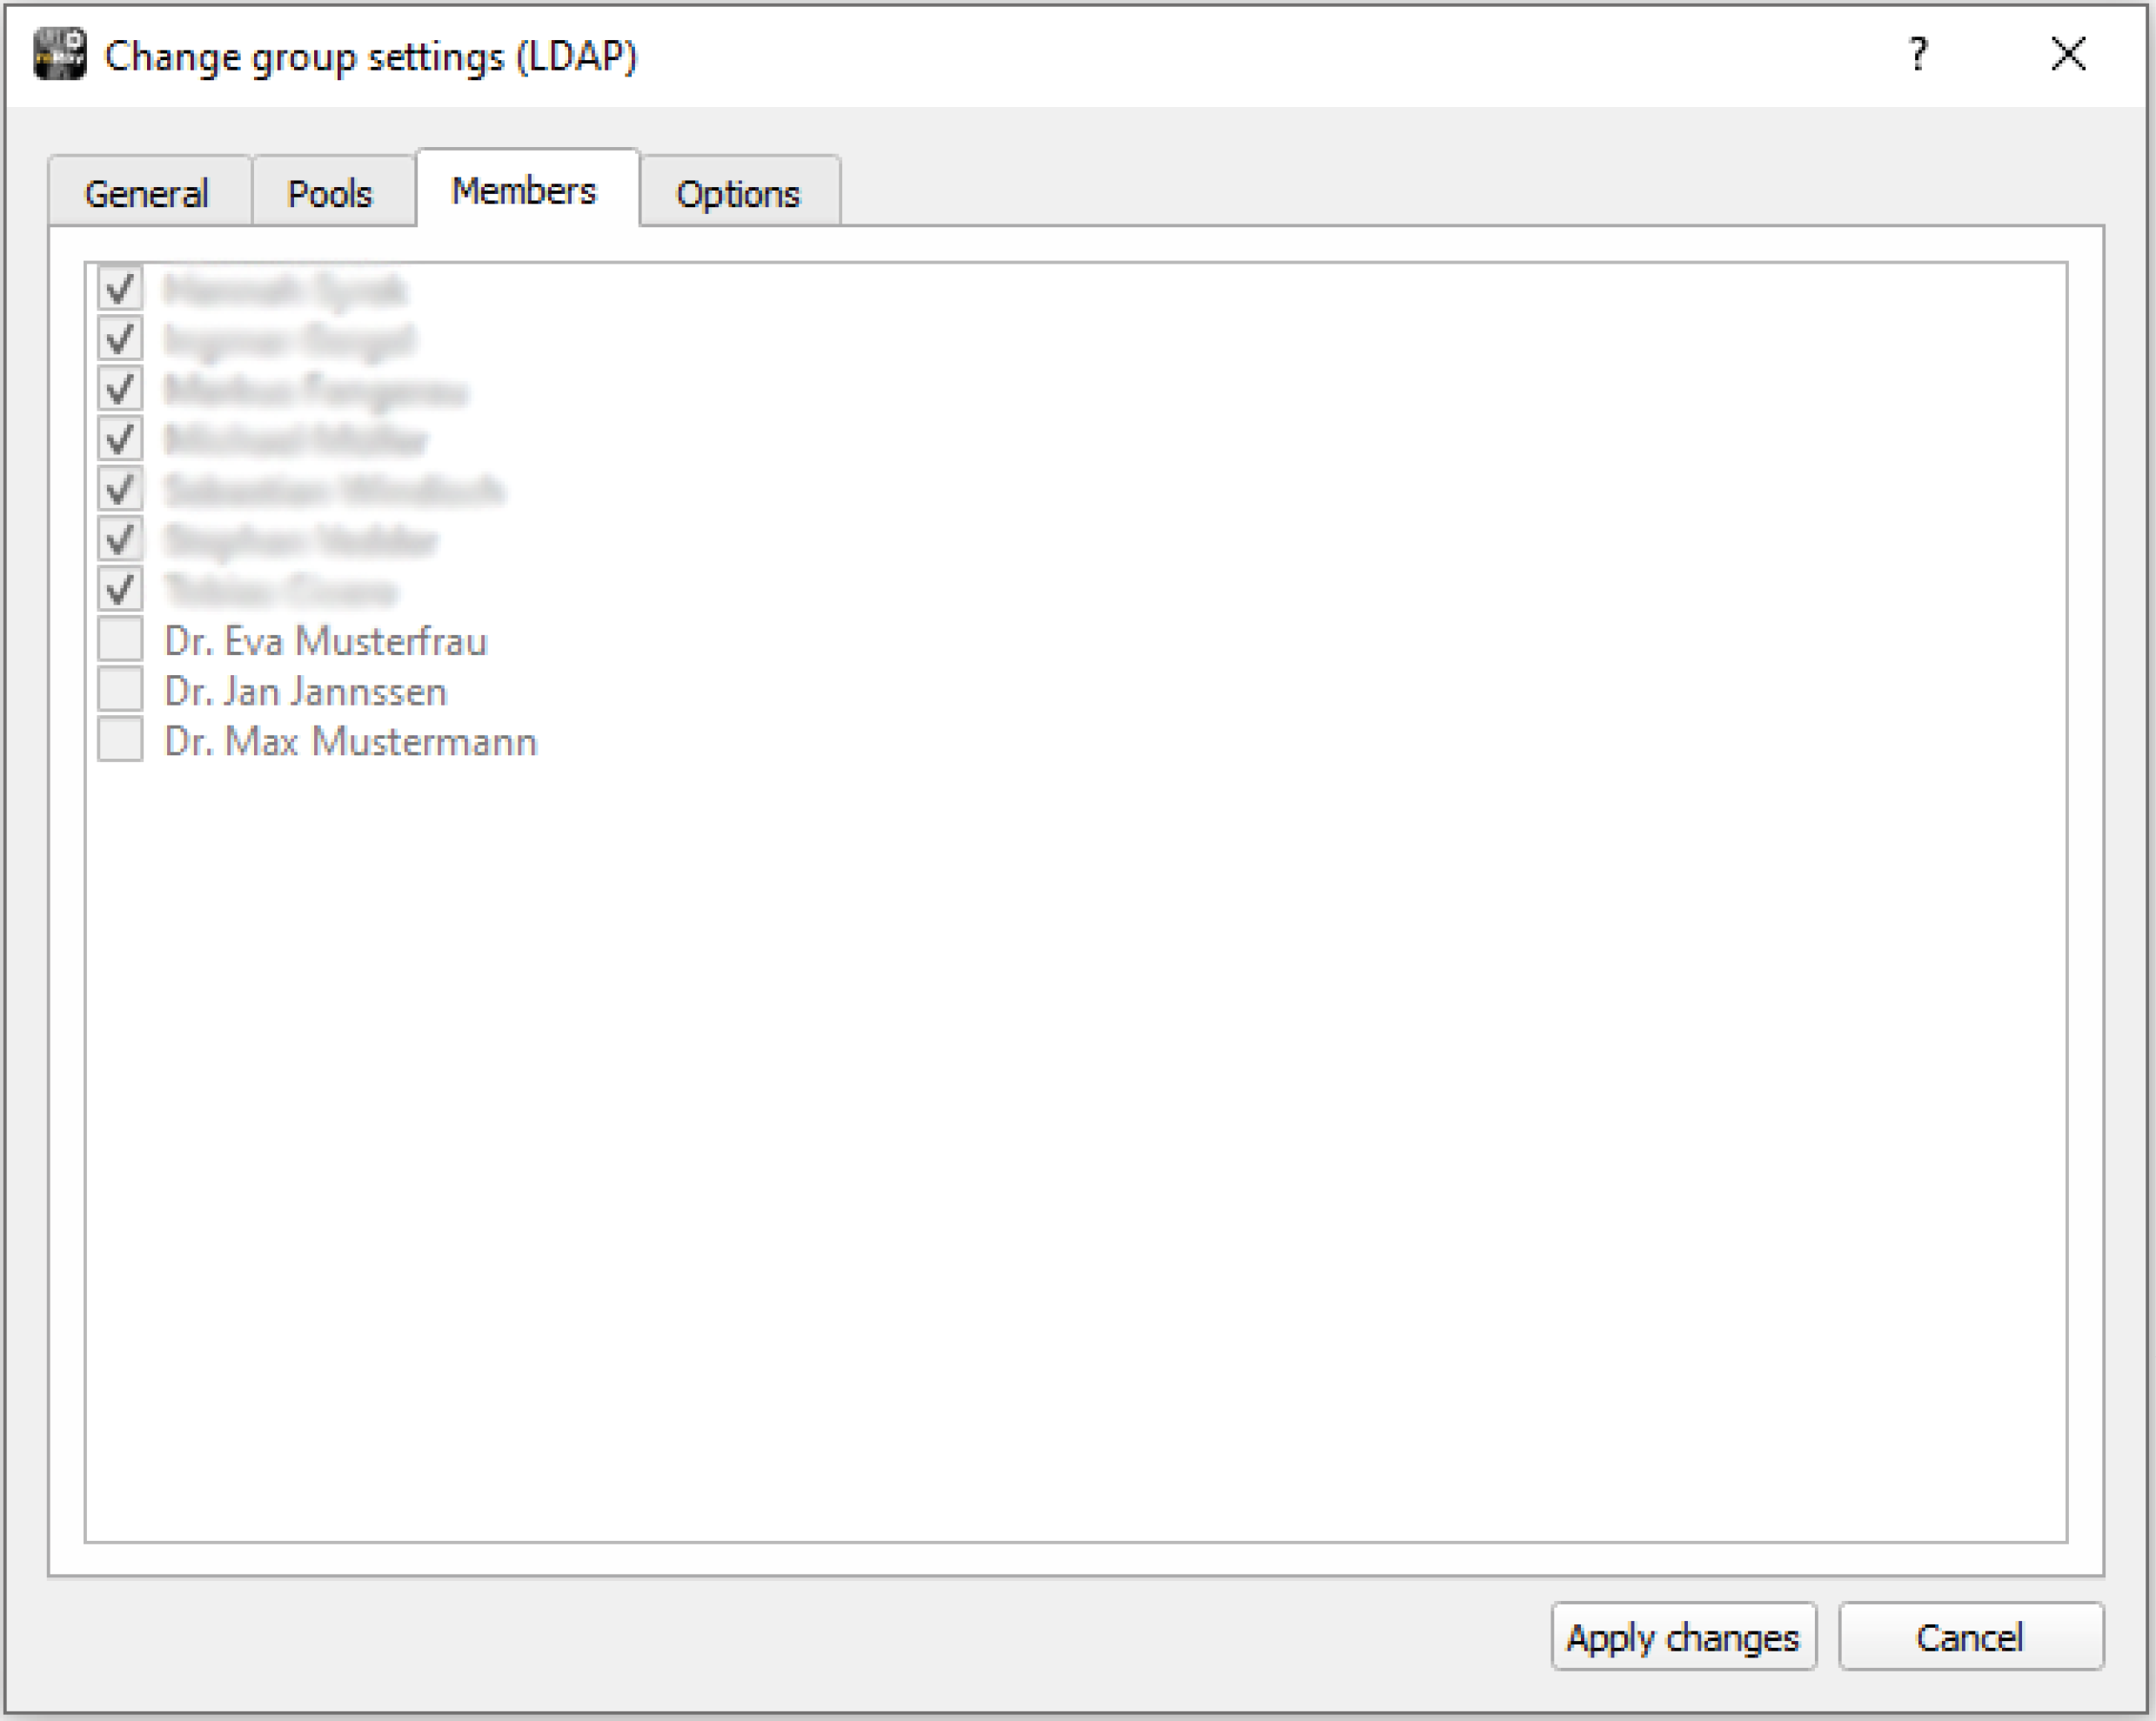
For LDAP groups, group membership is controlled via your Active Directory. Therefore a change via the user interface is not possible.
16.1.4. "Options"-Tab
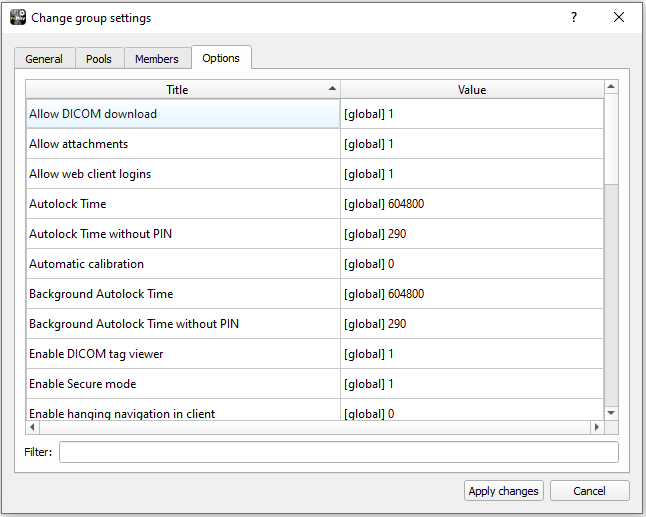
Use the Options tab to set additional settings and/or permissions for the respective group. A brief description of the purpose of an option can be found in the respective options dialog that opens when you edit an option.
17. Server log
The Log tab displays the last lines of the server log (see Server log). The log is the most important tool for tracing errors. To get access to the complete server log use the 'Export server log' button.
-
View verbose informations inside the log
-
Export the protocol to a file.
-
Search for specific log messages
-
Filter the entire log output
-
Specify a date range from when the log should be displayed
-
Filter the type of logging entries you want to see
18. Email SMTP
In the "E-Mail SMTP" tab you can store an e-mail account and a corresponding mail outgoing server. This is used to send e-mail notifications to users of mRay. An example is the automatic PIN notification with activated / licensed LDAP user synchronization.
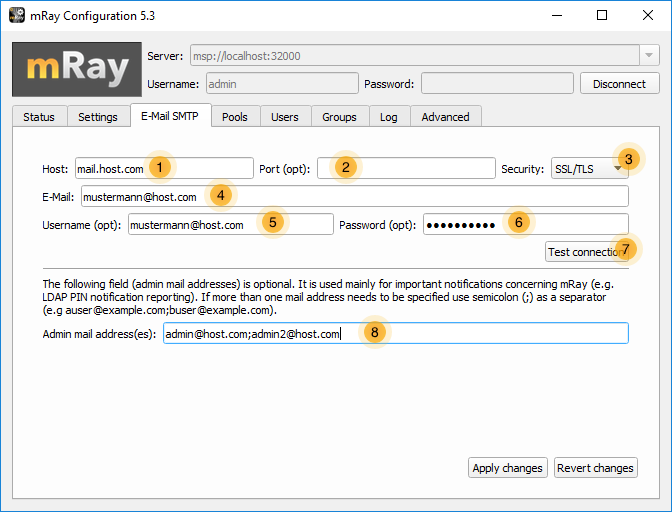
-
IP or name of the outgoing mail server to which the mails are forwarded for dispatch.
-
Port of the outgoing mail server (optional). This can vary depending on the security setting of the connection (see point 3).
-
Security setting / encryption regarding the communication link between mRay and the outgoing mail server. The following options are available: None = Unsecured connection (default ports: 25, 587), SSL / TLS = Secure connection (default port: 465), STARTTLS = Unsecured connection with upgrade to a secure connection (default ports: 25, 587).
-
E-mail address of the sender via which the notifications or e-mails are sent.
-
Username of the sender’s e-mail account for logging on to the outgoing mail server.
-
Password of the sender’s e-mail account for logging on to the outgoing mail server.
-
Checks the connection and logon data against the outgoing mail server.
-
Optional e-mail addresses of the administrators who are to receive important notifications regarding the operation of mRay (e.g., reporting on outgoing PIN notifications to users). Using the semicolon separator (;), you can specify several e-mail addresses.
19. Remote Auto-Update
Since version 5.3, you can also use the "About" dialog of the configuration to install server updates via a remote computer. To do this, go to the Update tab of the configuration "About" dialog.
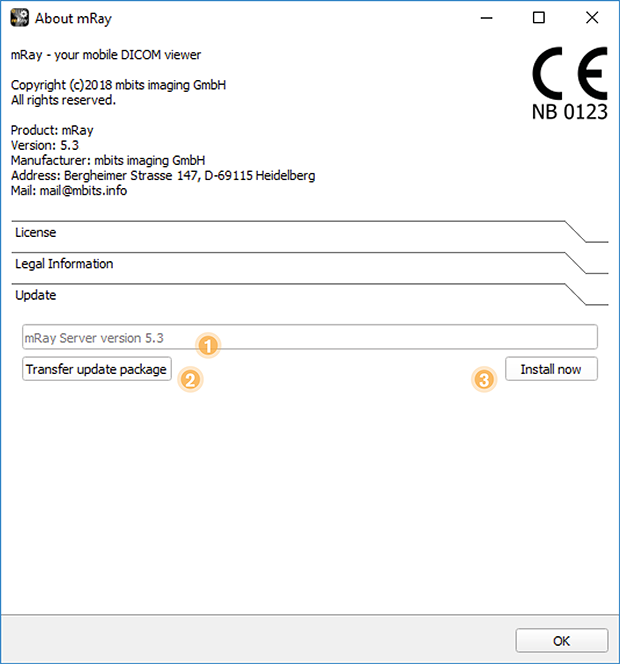
-
Shows the currently uploaded mRay Server Installer version. This is only displayed if it is a valid and supported installer.
-
Uploads the preselected mRay Server Installer.
-
Starts the currently uploaded mRay Server Installer to update the server.
20. Generate statistics
This dialog can be used to generate statistical reports about the usage of mRay.

-
Allows the selection of report types
-
Select export folder
-
Specify the time range for which the report should be generated
21. Advanced options
In addition to the default settings that you make through the graphical interface of the mRay Configuration application, there is an advanced options tab which allows to customize server and client behaviour.
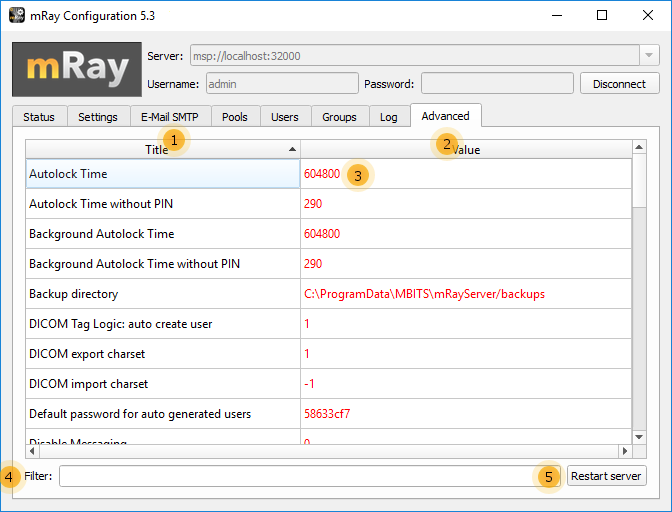
-
Title: Shows a readable name of the option.
-
Value: Shows the Value of the option.
-
Values displayed in black are default values, the bold ones are customized.
-
Filter: Use free text to find an option.
-
Restart Server: Restarts the server automatically.
|
Any change in the advanced options tab requires a restart of the server application to be applied. |
In order to edit an option, double click on its row to open the edit window.
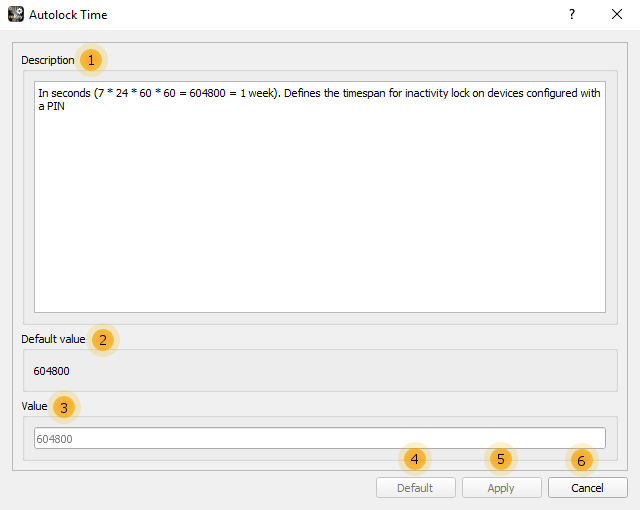
-
Description of the option.
-
Default value (can change between mRay versions).
-
Current value (grey means empty/default).
-
Reset the value to its default.
-
Apply the value and close the window.
-
Do not change the value and close the window.
22. Photo Documentation
The photo documentation feature is expressly not permitted to be used for diagnosis or treatment decisions. The feature is only available for evaluation purposes. To take part in the evaluation and use the photo documentation feature please contact the mbits support team. You may need an mRay server license that has the feature enabled and the following settings to be configured properly:
22.1. Advanced Options Tab
-
PhotoDoc-Tagging Entries Specification: Entered in advanced tab and specifies a tagging model in the JSON format that will be displayed on the client side
-
PhotoDoc - Export path: Specifies a folder that will be used by the server to export completed orders. Those orders are then picked picked up by the backend.
22.2. User/Group-Options
-
Enable photo capturing: Must be enabled so the photo capturing feature is available for the given user or group.
23. Teleradiology
In addition to the findings workflow and the justifying indication, the teleradiology module also includes the generation of documents of evidence for the constancy test in accordance with DIN 6868-157 and evidence relating to DIN 6868-159.
These reports can be created manually in the configuration application in the "Status" tab using "Generate Report". In the popup, you can select the desired time period.
|
The table "Monthly constancy check" lists the transfer times in seconds for all reported studies. According to DIN 6868-159, the transfer time can be calculated according to the pull model as follows: Start of transfer from the sender (usually a modality) to complete display on the receiver device. The pull model here describes the transfer from the sender to a server (mRay server), which is accessed by the teleradiologist. The transfer time is the sum of section 1 (Teilstrecke 1), from the sender to the mRay server, and section 2 (Teilstrecke 2), from retrieval of the image dataset to complete display in the mRay client. The requirements are fulfilled if the image dataset is completely transferred within 15 minutes and can be displayed in two windows. Sufficient quality of the image dataset is confirmed by approval of the associated report by the teleradiologist. |
24. System requirements
24.1. Target platform / Clinical integration
Clinical integration occurs on the server side, and all interfaces to image archiving systems (PACS) are implemented according to the DICOM standard.
The following sections describe the hardware requirements and operating system specifications for clinical integration.
24.2. Server
24.2.1. Operating System
The server software is installed on server operating systems provided by the customer (often in a virtual machine).
The following operating systems are supported:
-
Windows Server 2016
-
Windows Server 2019
-
Windows Server 2022
24.2.2. Hardware Requirements
The minimum Hardware specifications/requirements by default are:
-
CPU: Quadcore (x86 64bit)
-
RAM: min. 8 GB
-
Storage: min. 128 GB SSD for the installation drive. Secondary partition with 256 GB or more for the data
Depending on the amount of concurrent users and datasets, the host system hardware should be adjusted for normal operation.
24.2.3. Additional Modules
If VEOcore has been added as an additional configured module, the specifications increase as follows:
-
CPU: +1 Core
-
RAM: +4 GB
24.3. Gateway
24.3.1. Operating System
The gateway software is installed on operating systems provided by the customer often in a virtual machine located in the DMZ (demilitarized zone).
The following operating systems are supported:
-
Windows Server 2016
-
Windows Server 2019
-
Windows Server 2022
-
Windows 10
-
Windows 11
-
Ubuntu 20.04
-
Debian 10.2
24.3.2. Hardware Requirements
The hardware requirements are lower compared to mRay Server. The Gateway application consumes minimal resources.
Therefore the specification can be summed up to:
-
CPU: Dual core x86 64bit Processor
-
RAM: 4GB
-
Storage: 50GB
25. Security recommendations
-
Please make sure you keep device operating system up to date.
-
Always use the latest version of the mRay Server.
-
Forward only the ports required by the mRay Server.
-
Use a virus scanner (which might need configuration for the mRay Server)
26. FAQ
26.1. Server application
-
Why do all datasets except the last 20-30 disappear from the server?
Please check the free space on your server. See section General settings.
-
Which files should be backed up regularly?
-
On Windows the important files are saved in the folder
C:\ProgramData\MBITS\mRayServer. You should backup these files:-
config.ini(saves basic server options like port number, etc.) -
mraydb.mes(main database, saves everything concerning users, pools, etc.) -
mraydb.mes-wal(if available) -
license.ini(license which has been installed for the server activation) -
options.ini(advanced options)
-
-
Please notice that received image datasets might be located at a different place on the drive according to the settings made in the configuration. By default, the location described above is used. These can be backed up as well. In case of a reinstallation it is meaningful to resend the data from the PACS again where it is stored normally.
-
mRay features a built-in backup mechanism that saves the fundamental settings of the server. This process is triggered e.g. before an LDAP sync.
-
The installation package contains a backup script mRayServerBackup.bat which copies those files into a folder on the desktop.
26.2. Client application
-
Why do some datasets have the green tag ‘JPEG’?
Those datasets are transferred by employing JPEG compression (according to the Konsensius-Conference [Loose et al. 2009]).
-
The patient list does not show all datasets. Why?
Please ensure that the search field is empty.
-
Why are no results shown after performing a query search to my PACS, although the patient is listed in my PACS?
Some PACS distributors require a case sensitive search. Searching for “smith” will not lead to a result list as searching for “Smith” does.
26.3. Gateway
-
Is data stored on the Gateway?
No. The gateway is only a connection mediator, comparable to a reverse proxy. No data is stored on the gateway at any time.
26.4. Data security
-
How can I manage device access?
mRay provides the ability to manage the sharing of devices with the mRay system. The following options can be selected:
-
All devices are automatically approved
-
Only the first device of a user is automatically allowed. All other devices require the approval of an mRay administrator
-
No device is automatically allowed. All must be enabled by an mRay administrator
-
26.5. PACS-Interface
- Where can I find the DICOM Conformance Statement?
-
The DICOM Conformance Statement can be found at https://mbits.info/downloads/DICOMConformanceStatement.pdf
27. Known issues
The list of known issues leads to problems identified after the release of the latest version of mRay. These problems, however, were classified as non-critical, so that an unrestricted working with the application is possible.
-
Pseudonymization of images is not applied to the burned- in pixel data information. Please communicate this fact to the users to ensure that the data is sent only to pools for which Pseudonymization is turned off.
-
Form fields for floating point numbers within the configuration application only accept values in English format, i.e. with a point as a delimiter.
-
The auto-download setting WiFi/Mobile is not applicable for the Windows version of mRay client app.
-
Multi touch gestures might trigger a button press event if they end above a button. This will happen although the gesture is recognized as intended.
-
The camera on a MED-TAB v2 does not focus correctly.
-
Emojis in text fields can behave unexpectedly.
-
A global cache path to a network drive can cause problems (concerns mRay server only)
-
Automatic memory management on the mobile device may be incorrect if several mRay accounts are used on the device. Although the data is no longer accessible, they are not deleted under certain circumstances.
-
Right click is not working on Windows Surface
-
mRay server license changes to invalid after activating VPN controller
-
Messaging: attachment is rendered with 'no access' despite being able to open the attachment
-
Inbox: Search within study that has no result leads to jumping back to top level (usability bug)
-
Multi-Frame MR images are do not fully supported. Varying spacing on one slice is not supported.
-
Screen stays black when app is started after update of the device
-
Mobile Web Client file upload not supported in mRay
-
During server configuration it may be possible that changes to the user database will lead to a re-connect for currently connected clients.
-
In some very rare cases the install process may fail due to a blocked dll file. Installation can be continued/succeeded by restarting the machine. (concerns mRay server only)
-
On some Android devices like e.g. Google Pixel 4a mRay shows a black screen after start, which isn’t fixed by waiting for a certain amount of time. A possible solution is to manually force quit the app and start over again.
-
In some very rare cases PDF reports generated by a plugin are empty. The reports are retrieved from a PACS as DICOM structured report to generate a PDF using a template. (concerns mRay server only)
-
Speech to text on iOS may not work when used for the first time. Try using speech to text in another app and return to mRay.
-
On some smaller devices it’s possible that the server field is not visible inside the login screen when device is held in landscape orientation.
-
Text scrolling in multiline textfields on iOS is not possible, if the textfield is contained in a scroll area. To scroll use the scrollbar of the scroll area instead.
-
Text input inside the webclient can occasionally stop working. Refresh the page to fix the error.
27.1. VEOcore
-
Symmetric Gaussian in Fourier can lead to slight numerical inaccuracies for even matrix sizes.
28. Information
-
The DICOM conformance statement can be consulted at the following address.
-
To avoid operating delays in your medical office or station in case of a failure of your main device by e.g. a hardware defect, operating system failure, overheating or similar please make sure that you always keep a functional backup device ready.
-
If JPEG compression is selected for a pool it is not guaranteed that all datasets are compressed using JPEG encoding. Please note the information in Pool-Management about supported number of bits. The decision between lossless and JPEG compression is also based on the resulting size of a dataset.
-
If anti-virus software is used please make sure that the configuration prevents possible data losses for directories containing patient data.